
Adventure Escape Mysteries has numerous murder mystery stories you can unravel by unlocking chapters. Rendezvous, introduced in July 2025, follows the story of two characters, Kate and Melissa, as they search for Kate’s sister, Allie, in France.
Let’s dive right into a complete walkthrough of Adventure Escape Mysteries: Rendezvous, including every item you need to find to progress throughout its seven chapters.
Adventure Escape Mysteries: Rendezvous chapter one walkthrough
Adventure Escape Mysteries: Rendezvous’s first chapter begins with Kate and Melissa talking about a mysterious package addressed to Allie, Kate’s sister, and how to open it. Here’s a complete step-by-step to solving this section:
- Follow the tutorial by opening the blue toolbox and closing its menu.
- Check under the couch pillow for a key.
- Use the key on the desk drawer and read the note.
- Collect the hidden star on the bookshelf, followed by the tutorial’s free stars.
- Use the note’s clues to turn the toolbox’s dials so they read as “KEY.” Claim the box cutter and the Phillips-head screwdriver.
- Grab the red mug on the desk and the blacklight on the bookshelf.
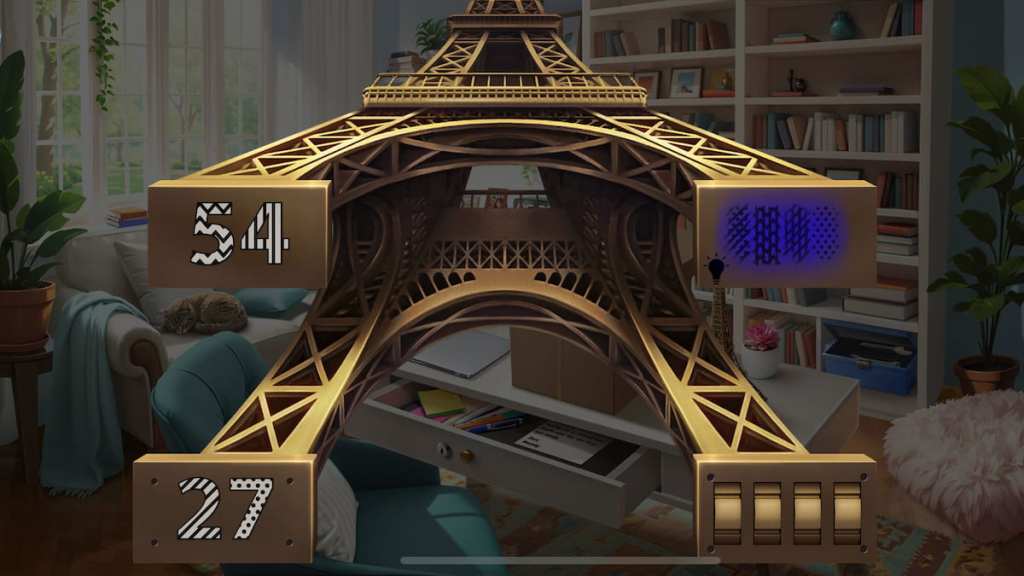
- Use the box cutter on the cardboard box to find a miniature Eiffel Tower.
- Tap on the Eiffel Tower. Use the box cutter on the barcode to reveal 54. Pay attention to its patterns.
- Use the box cutter on the bottom-left leg to reveal 27.
- Use the blacklight on the top-right leg to reveal the order of each number by their pattern. Some patterns overlap, requiring us to add certain numbers together.

- Use the Phillips head screwdriver on the bottom-right leg to find a four-digit number puzzle. Using the pattern hint as a reference, input the following numbers:
- 2+7 = 9
- 5+4 = 9
- 2+4 = 6
- 7
- Solution: 9967
- Read the scroll inside. Place the red mug atop the note to find an address, 53 Rue de Plauner.


After solving this set of puzzles, Kate and Melissa will take a trip to France to find Kate’s sister, Allie. You’ll now have another batch of items to find and puzzles to solve, as detailed below:
- Collect the two name placards from the center table.
- Tap on the desk. Open the two right drawers to find computer chips and a blank ID card, followed by another name placard and a handwheel in the bottom-left compartment.
- Select the keycard printer next to the computer monitor. Insert the chips and connect each one by its color. You can rotate each chip by tapping on it. You’ll find the exact solution below:

- Read the résidents and créateur de cartes d’identité files.
- Head back to the lobby. Tap on the phone inside the table’s purse to call Murphy. He’ll tell you Allie’s birthday is March 24.
- Head to the computer and insert 5, 24, and 3 into each category before creating the card. Use your blank ID card on the card machine.

- Head back to the lobby. Use the handwheel on the golden pipe next to the couch. Grab the placard in the water.
- Use the four placards on the wall above the flowers. Rearrange them according to the symbols, as shown in the image below:

Completing this puzzle will reveal a card reader next to the elevator. Use your new keycard to unlock it, letting you access Allie’s penthouse room. Here are your next steps to solving this section:
- Collect the purple flower from under the carpet.
- Interact with the hallway table’s drawers to find a green flower and a stylus. Tapping on the plant will also give you Pampas grass.
- Pull open the curtain and collect the orange flower.
- Tap on the dark square under this same window to reveal a button. Use the Pampas grass to activate it and find a gold key.

- Insert the three flowers into the flower painting to reveal a map puzzle. Your goal is to swap pieces to form a picture while using the arrow button to flip them horizontally, as needed. You’ll find the solution in the image below:

- Collect the diamond key from the completed puzzle.
- Tap on the window behind the curtain from before. Open its secret panel and use both keys to uncover another puzzle.
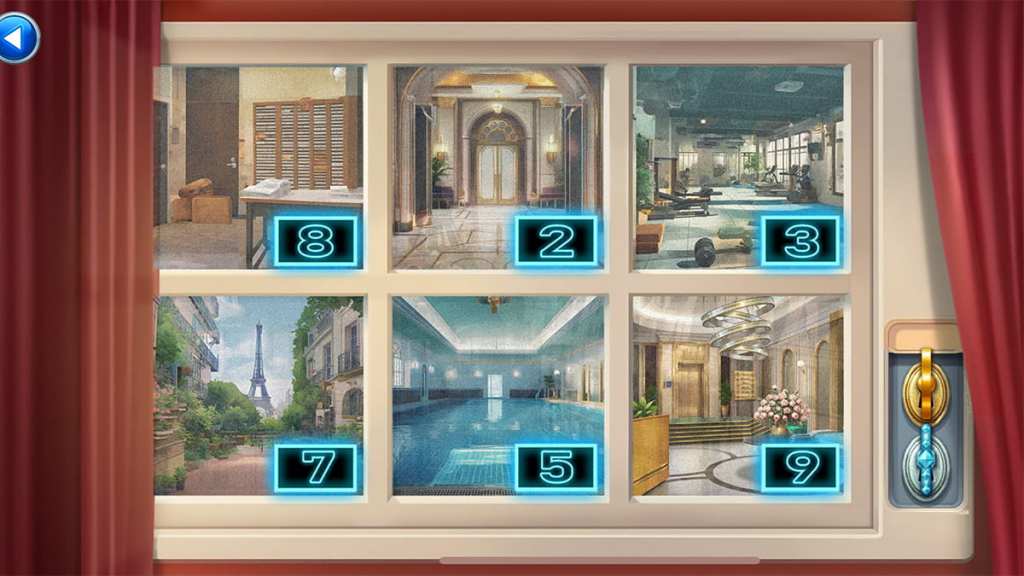
- Using the previous puzzle’s camera values as a hint, insert the following numbers into each spot:
- Mailroom: 8
- Front entrance: 2
- Gym: 3
- Outside: 7
- Pool: 5
- Lobby: 9
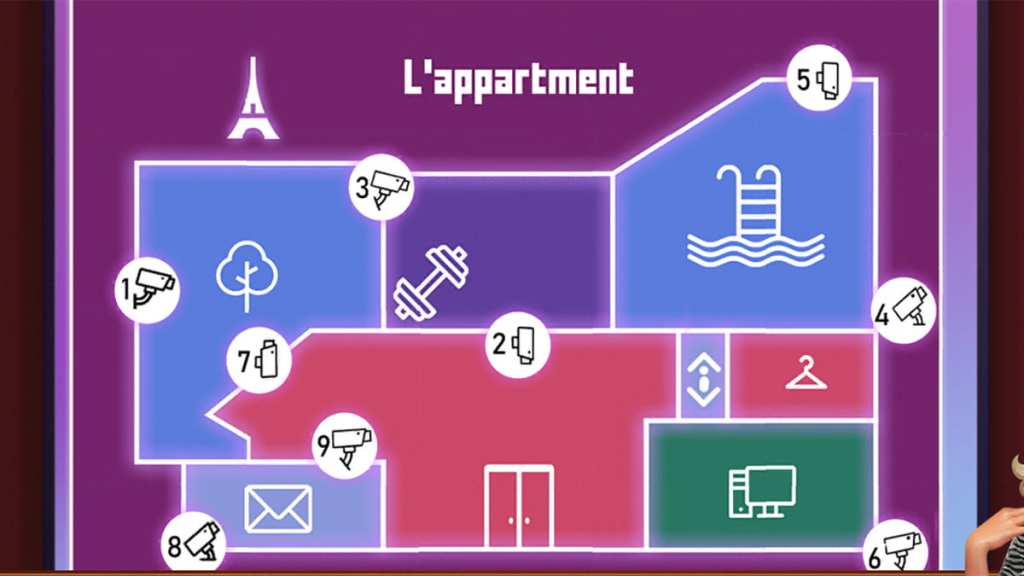
Completing the puzzle above will reveal a keypad that unlocks the door. The panel appears as another puzzle that references the previous number set. This time, the set on its left side reveals the order in which you need to input each number.
With this in mind, use your stylus to input 275398 into the panel, letting you unlock Allie’s room.

Finishing this puzzle will lead to a cutscene involving you, Allie, and Melissa. Watching it will wrap up Adventure Escape Mysteries: Rendezvous’s first chapter, leading directly into its second part.
Adventure Escape Mysteries: Rendezvous chapter two walkthrough
As you begin Adventure Escape Mysteries: Rendezvous’s second chapter, you’ll learn more about Allie and her fiancé, Mark. You’ll visit Mark’s cafe gallery and witness a customer, Lynn, talking about the disappearance of her boyfriend, Luc. Your first objective is to disable the cafe’s Wi-Fi before investigating further.
With these new clues in mind, take the steps below to start Adventure Escape Mysteries: Rendezvous’s second chapter:
- Once Kate starts holding her phone, drag it over the doorway to discover that the Wi-Fi signal is stronger in the gallery.
- Tap on the gallery door and repeat the process to discover the router behind a poem next to the cafe’s doorway.

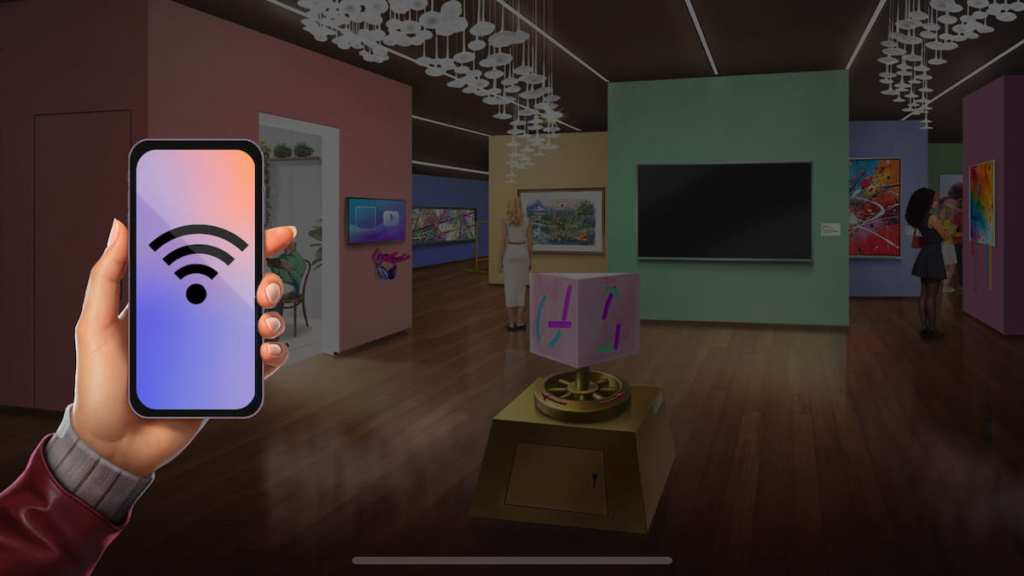
- Select the router’s display to find a colored dot puzzle. You’ll find the solution by interacting with the line sculpture in the center of the gallery and imagining each color section combining into distinct numbers. Doing so reveals the following answers:


- With these three numbers in mind, tap on the audio exhibit’s blue screen next to the cafe’s entrance. Input the three numbers above to get the following hints:
- 2 – River and mountain lap up the glorious sun. The deer takes it in.
- 4 – Mountain calls to deer, arise and smell the roses like your friend the bird.
- 6 – As the swift river meets the pond, the resting deer nibbles the berries.
- Now that we have these new hints, interact with the painting above the colored number sculpture. Using the audio exhibit’s answers as a reference, connect each segment of the painting using the dots to find your three answers for the colored dot puzzle. You’ll find each solution below:
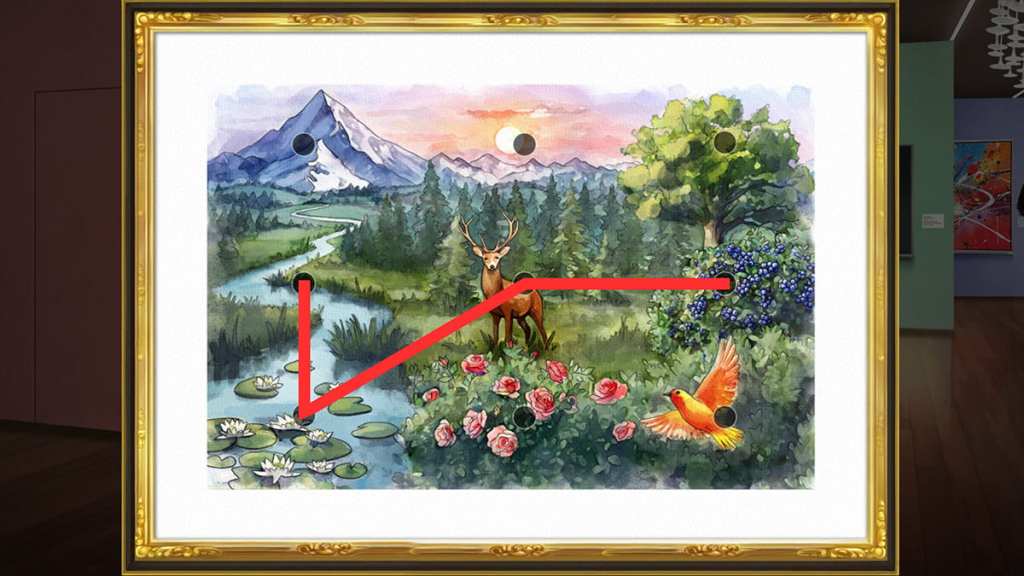
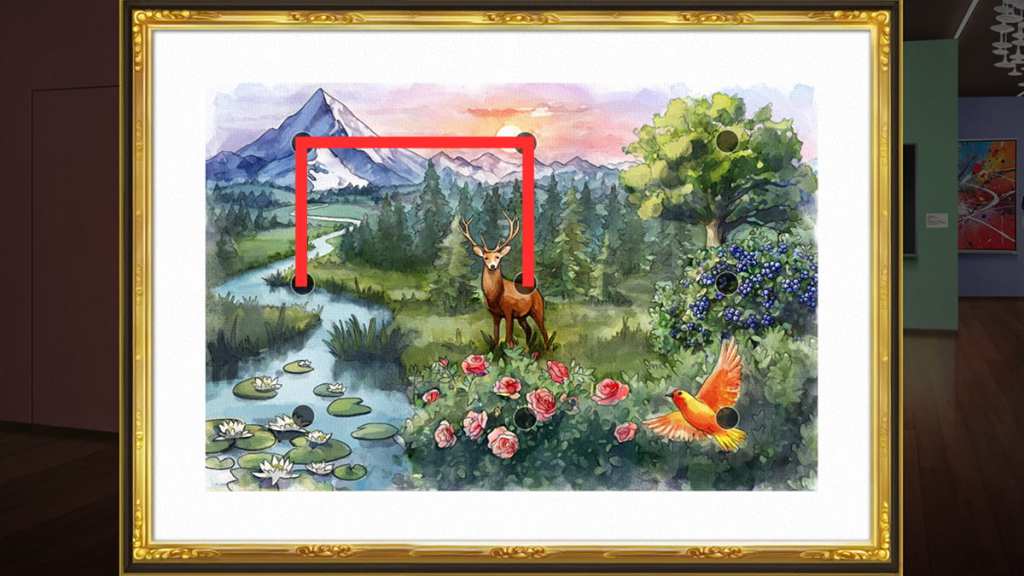
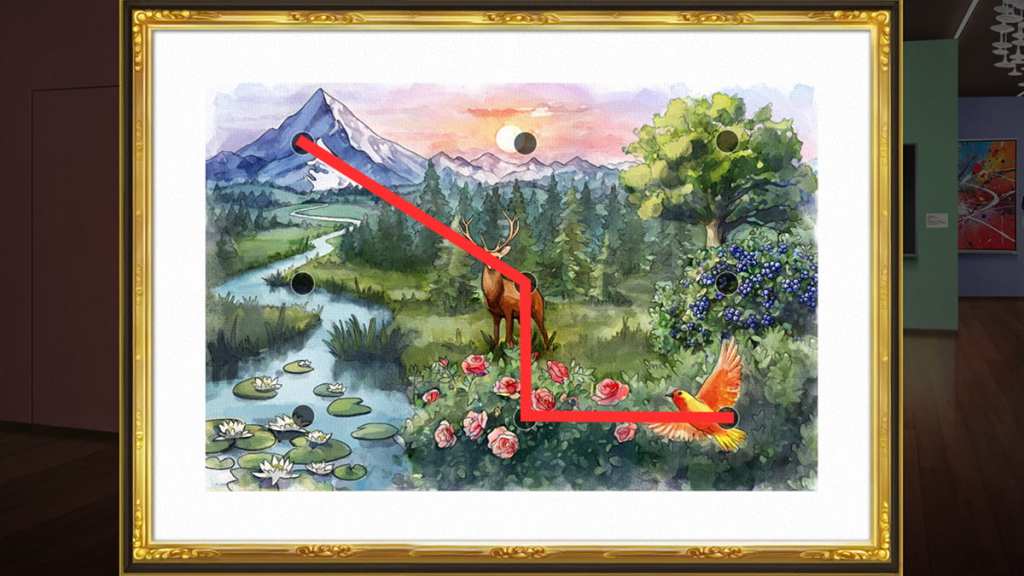

- Now that we have this final piece of the puzzle, activate each line within the dot puzzle to access its cables. Tap on it to find a dead remote and a USB.
- Before returning to the cafe, open the closet door next to the router to collect your first sculpture piece.
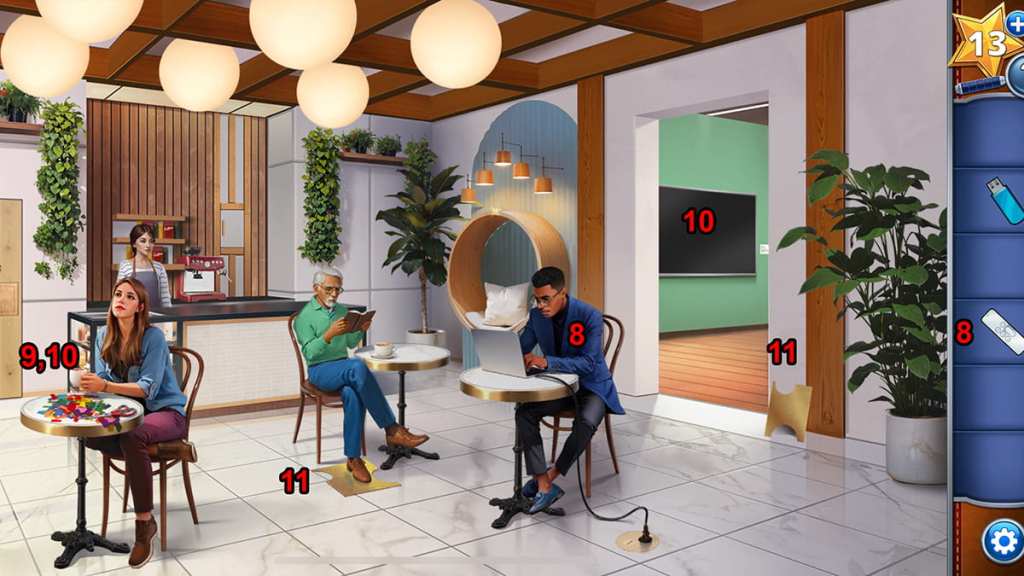
- Head back into the cafe and use the dead remote on the customer with the laptop to turn it into a charged remote.
- Talk to the customer with scissors and colored fabric in front of them. They’ll ask you to turn the TV in the gallery on in exchange for their scissors.
- Use your charged remote on the TV to turn it on before returning to the cafe and collecting the scissors.
- Use the scissors on the router spot to deactivate the gallery’s Wi-Fi. Collect the two sculpture pieces from under the table where the older customer was sitting and next to the gallery’s entrance.

- Go behind the cafe’s counter. Collect the sculpture piece before opening the cabinet and grabbing some paint.
- Activate the green button to uncover a panel on a wooden door.

- Return to the gallery. Tap on the painting in the far back corner of the area and insert your four sculpture pieces into its display. You’ll find this puzzle’s solution in the picture below:

- Return to the wooden door you recently uncovered. Match the colored numbers to their respective door spots. If there are multiple of the same color, use whichever circle size matches that of the door. Doing so reveals the combination as 72694.

- Opening the door leads you into Mark’s studio. Pick up the electrical tape from atop the table next to the staircase.
- Grab the drum key off the floor and the empty cup on the blue chair’s arm.
- Use the drum key on the drum set to open it, letting you pick up a small key and a second USB.

- Return to the cafe’s barista counter. Use the empty cup on the espresso machine to make an espresso.
- Go to the gallery and use the small key on the locked display under the colored number sculpture. Pick up the paint and art supplies from inside it.
- Climb back up to Mark’s studio. Place the espresso cup on the chair’s arm to unlock a secret compartment containing a third USB and some extra paint.
- Select the parchment on the table. Use the paint and art supplies on it to start a new puzzle.
There are multiple aspects to this next puzzle. Using the four paint colors and their numbers, you’ll need to place paint drops based on each square’s sum and the number of droplets they require, shown by the dots above each square. Here’s how each square should look before completing the puzzle:

Once you place every droplet, use your brush on each space to paint them in. If you accidentally use the wrong paint, you can use the paint knife to scrape it away. After completing all eight squares, press the arrows to process them and wrap up the puzzle.

Finishing the puzzle will reveal a 3D printer with a USB beside it. Follow the steps below to finish the rest of the chapter:
- Pick up the USB next to the 3D printer.
- Head down to the art gallery. Use the electrical tape on the router to fix the Wi-Fi.
- Return to Mark’s studio and tap on the PC in the back right corner. Insert all four USBs into it.
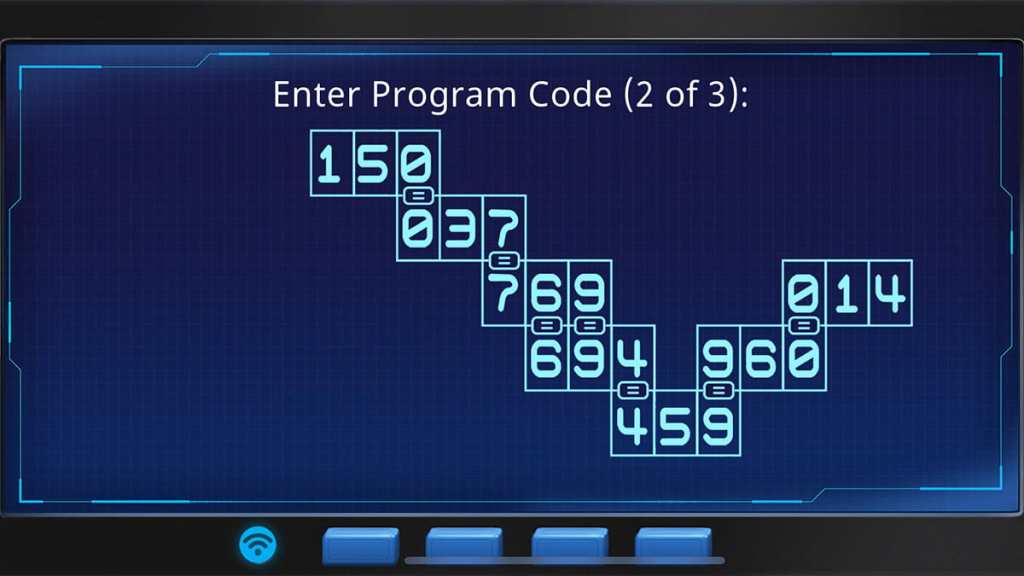
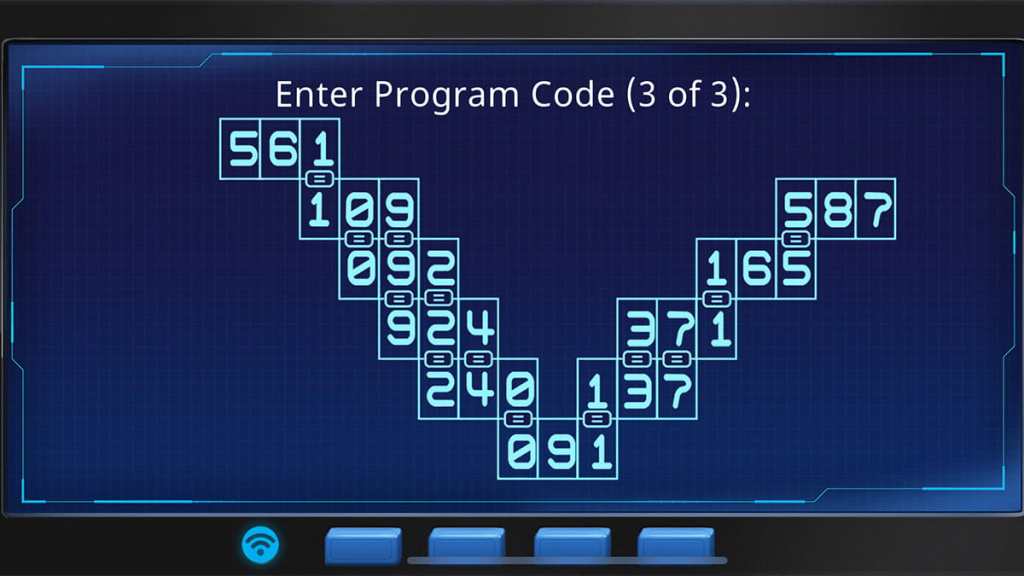
You’ll now have one final puzzle to complete for this second chapter. Your goal is to insert each set of numbers into each square. You’ll need to align them so that those below and above the equal signs match. Here are the solutions for all three parts:
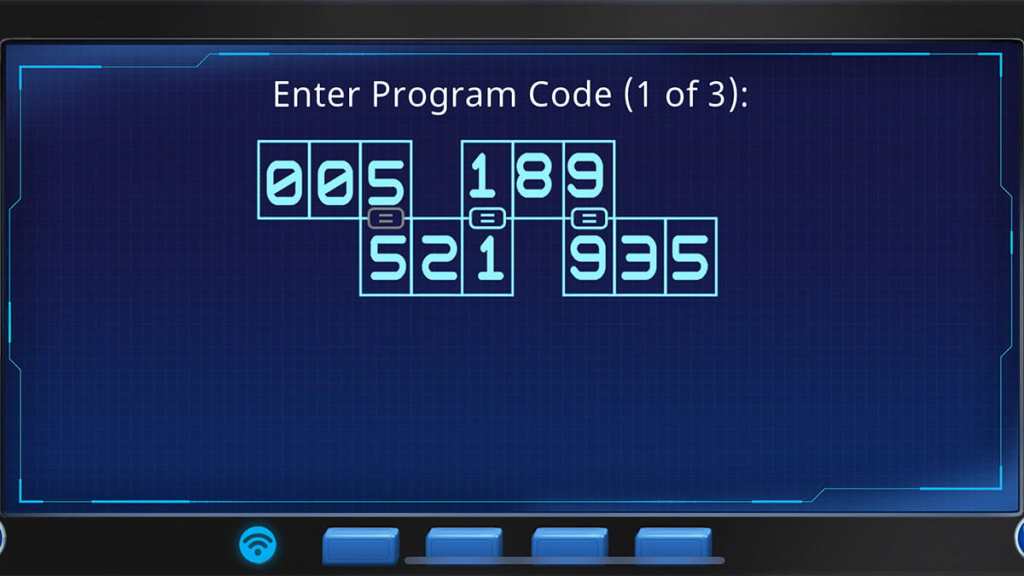
Completing the puzzle reveals multiple plot points that Kate and Melissa will discuss in the next chapter. Following this conversation, you’ll complete Adventure Escape Mysteries: Rendezvous’s second chapter and be ready to begin part three.
Adventure Escape Mysteries: Rendezvous chapter three walkthrough
After Kate and Melissa tell Allie about their findings regarding Mark’s AI usage, Camille’s card, and Luc’s disappearance, Allie will call Camille and Luc to see what’s going on. The situation is suspicious, prompting Kate and Melissa to investigate further. Here are some initial steps to take:
- Collect the painting from under the couch. Move the purple blanket to reveal a puzzle.
- Pick up the candlestick from the table and the vase from next to the fireplace.
- Move one of the couch pillows to find a knob. You’ll find another knob inside a cabinet next to the teal chair.
- Place the candlestick atop the cabinet.

- Tap on the terrace door. Pick up the cheese knife from the small table.
- Grab the knob on the outer ledge and the painting before heading back inside.

Now that we’ve collected every item from this area, it’s time to solve a puzzle involving the couch pattern, the flowers on the cabinet, and the bedroom door’s lock. Our first step is to look at the couch’s puzzle. Each circle has a pattern, which you can match up with four squares on the cabinet’s flower puzzle.

Using this as a reference, trace the flower puzzle’s paths for each of the four patterns. You’ll find the four paths and destinations in the images below.
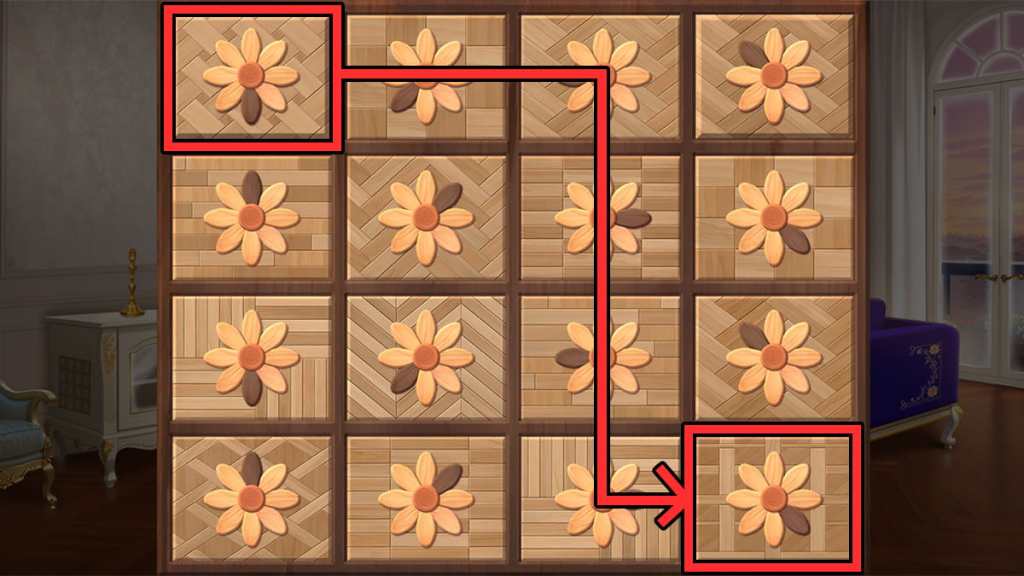
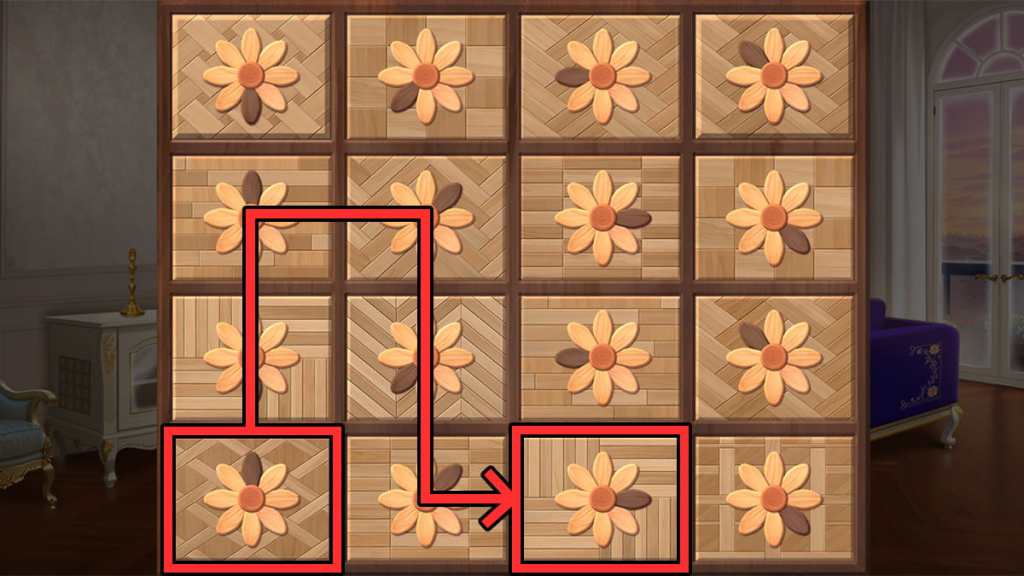
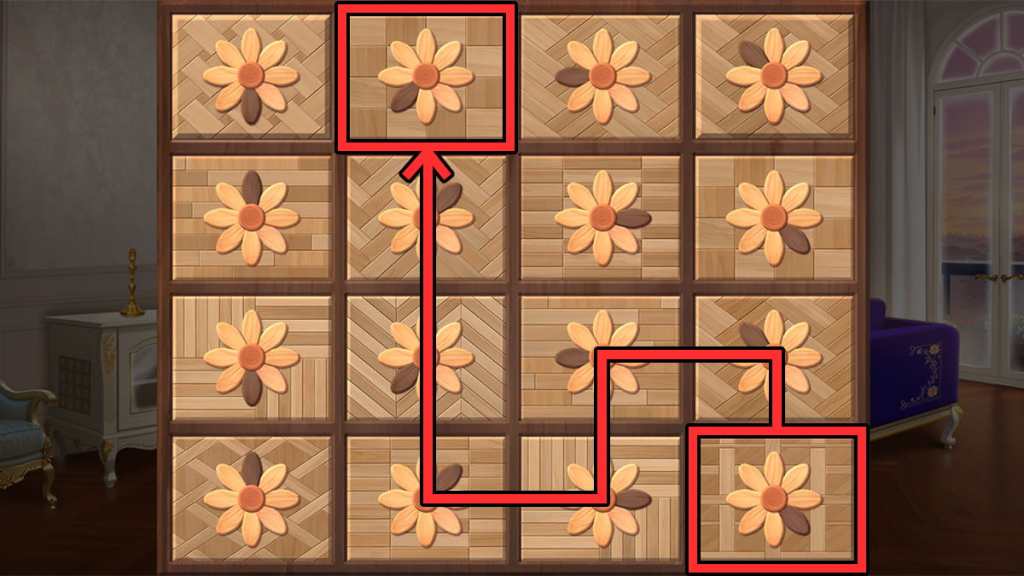
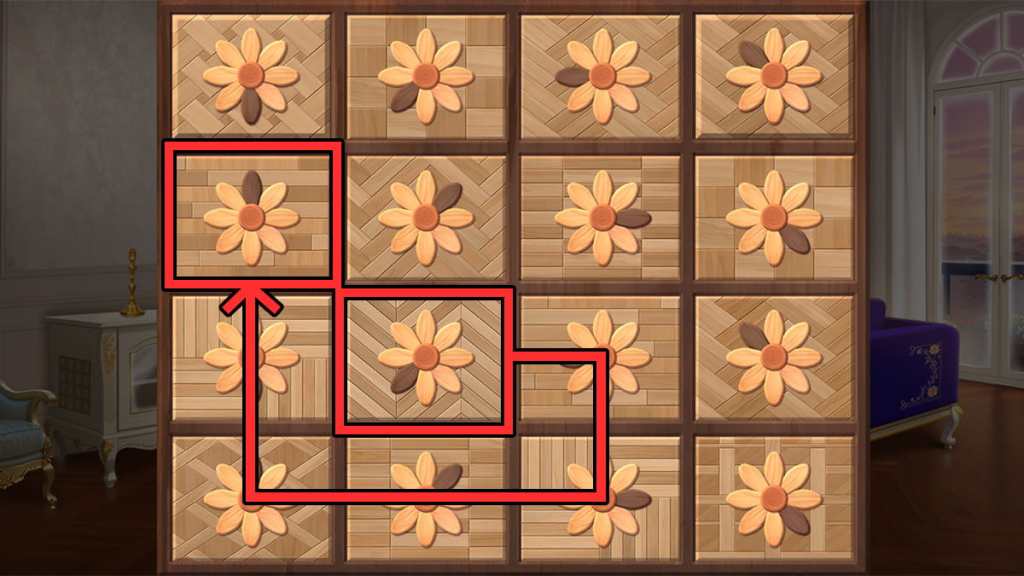
As you mentally map out each path, note the locations of the flowers’ dark petals. Head to the bedroom door and tap on each circle to match the four petals. Doing so will unlock the door, allowing you to explore Allie’s bedroom for more clues.

Now that we’re in a new area, use the steps below to advance further:
- Pry the nightstand next to the bed open with your cheese knife to remove its knob.
- Use the sink to fill your vase with water.
- Use the vase of water on the fireplace in the living room to reveal another puzzle. Place the four knobs inside the puzzle.
With this puzzle, your objective is to place and rotate each knob until they’re pointing to the number of knobs shown on their center circle. You need to do this for the ones already on the board and the four purple versions you picked up earlier in this chapter. You’ll find the solution in the picture below:

Finishing the puzzle will reward you with another painting and a note. Reading the note will give you a clue, “From east to west,” with an arrangement that matches the paintings above Allie’s bed. Return to her bedroom and place your paintings within the four canvases to begin another puzzle.

The solution lies beyond the terrace. There are four landmarks—the Eiffel Tower, Notre-Dame, Les Invalides, and the Tour Montparnasse. You’ll arrange each painting by looking at the easternmost landmark and moving west while following the arrows shown on the note. The images below show the answer to this puzzle.

Solving this puzzle reveals another note, telling you “the clock is the key. Turn the time to 3:08.” Interact with the clock in the living room. Before Kate gets a chance to do so, a dart will fly at her, sending her through a trapdoor.
We’re now stuck inside an underground cell. Follow the steps below to get Kate out of this predicament:
- Tap on the pillow and pick up the board underneath it.
- Cut open the mattress on the floor using your cheese knife. Pick up the glass pieces.
- Tap on the display on the glass door. Drag the glass pieces to the interface to start another puzzle.

For this puzzle, you need to place each glass piece onto the grid. They all have symbols with two traits—shape and color. Each shape has to share exactly one trait with those above or below it, while also sharing zero traits with those to its left or right. The picture below shows this puzzle’s solution:

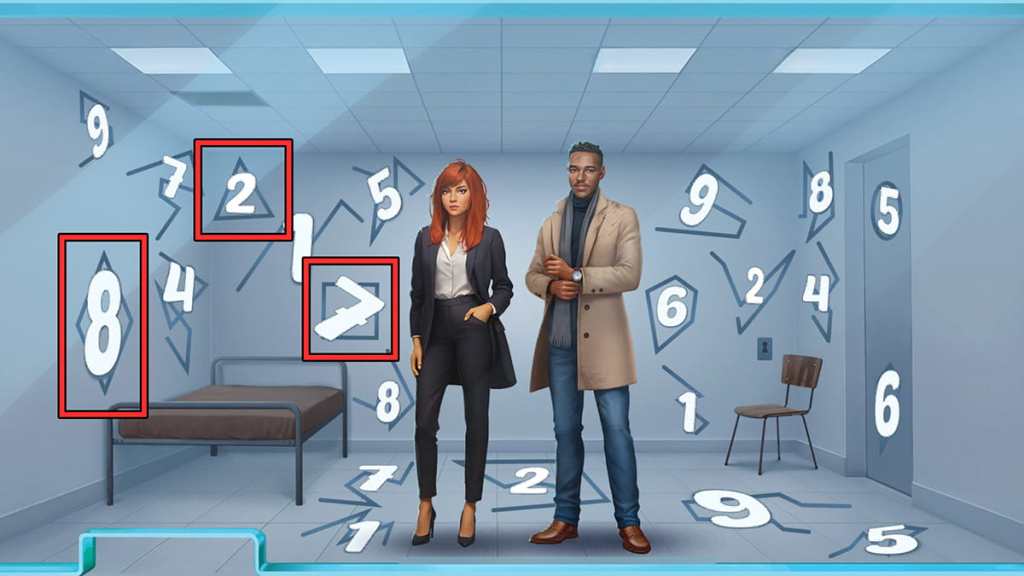
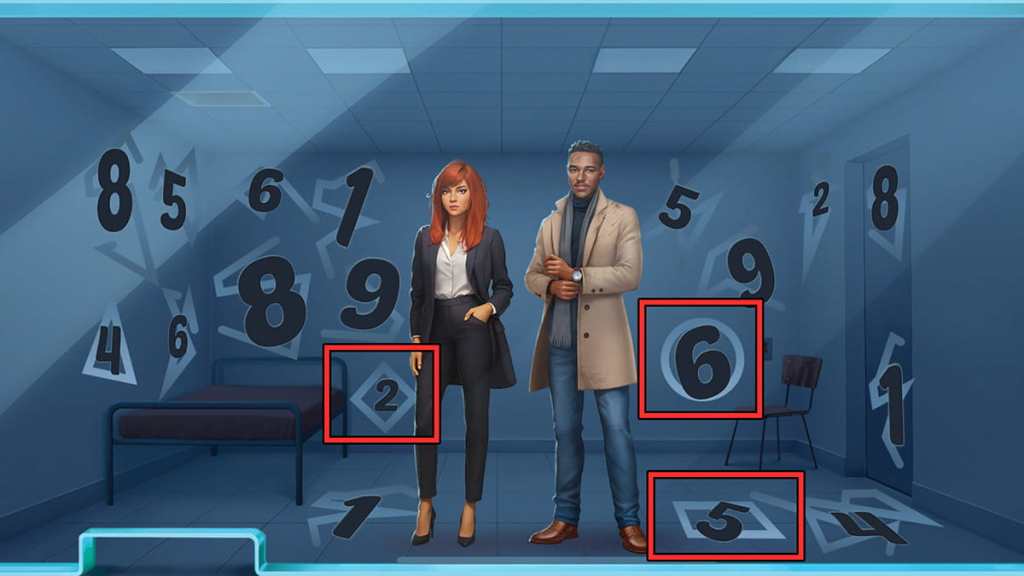
Now that you’re out of the cell, pick up the number board underneath the TV stand and look at it. At first, you’ll see dozens of numbers and arrows. Placing the board atop it will reveal your starting position and number: a one with an arrow pointing northeast. The arrow signifies which direction the next number is, while the number indicates how many squares away it is.
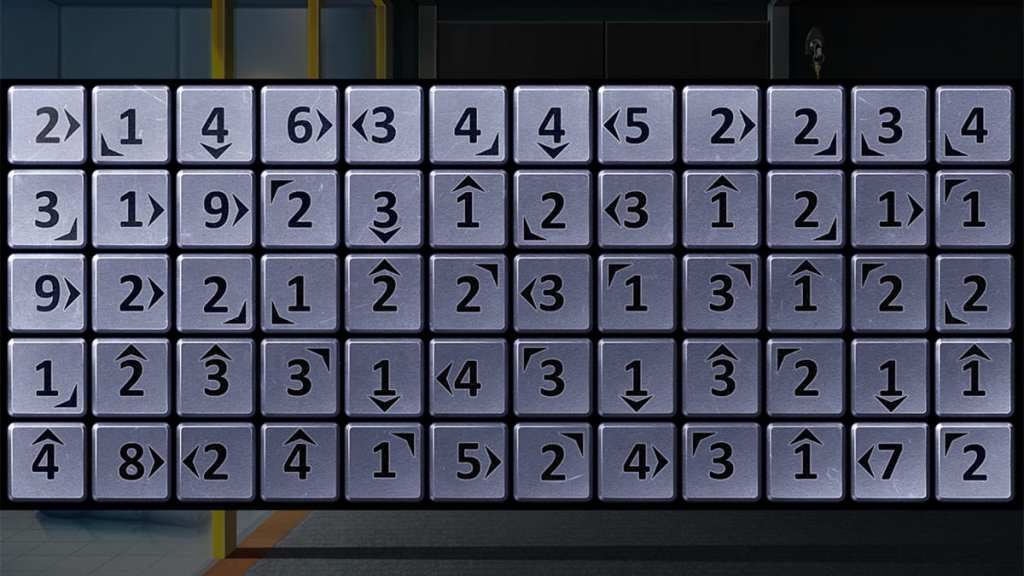
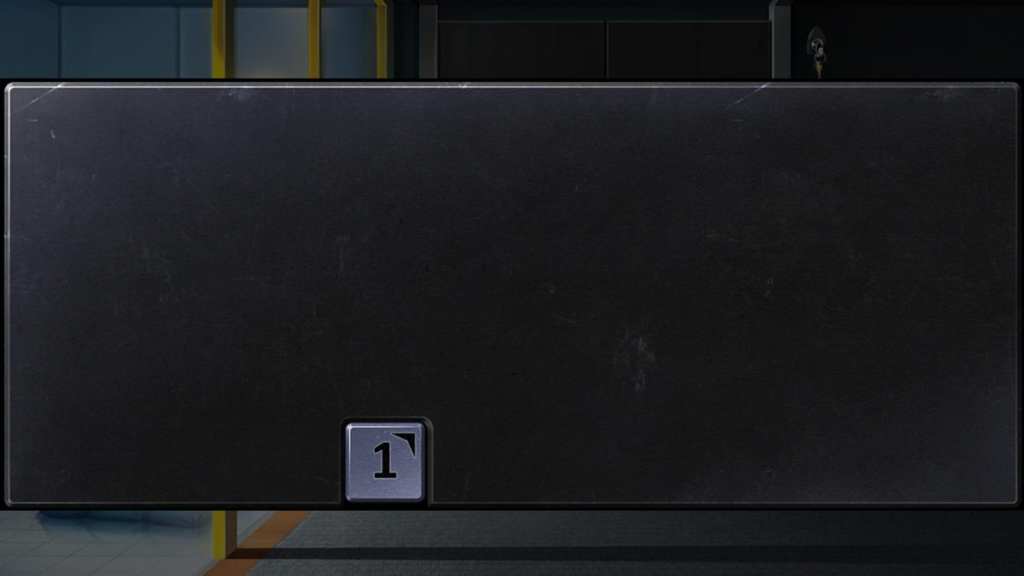
With this information in mind, tap on the display next to the red door. Select the square that matches the one on the number board and follow its directions to activate the rest. You’ll find the full solution below:

After activating every square, you’ll discover that it spells out “GRAY.” You’ll unlock a video surveillance area and gain an invitation. Once you’re ready, grab the baguette from the desk and use it to knock over the key above the red door. Unlock the door to escape the underground area, find Melissa, and wrap up Adventure Escape Mysteries: Rendezvous’s third chapter.
Adventure Escape Mysteries: Rendezvous chapter four walkthrough
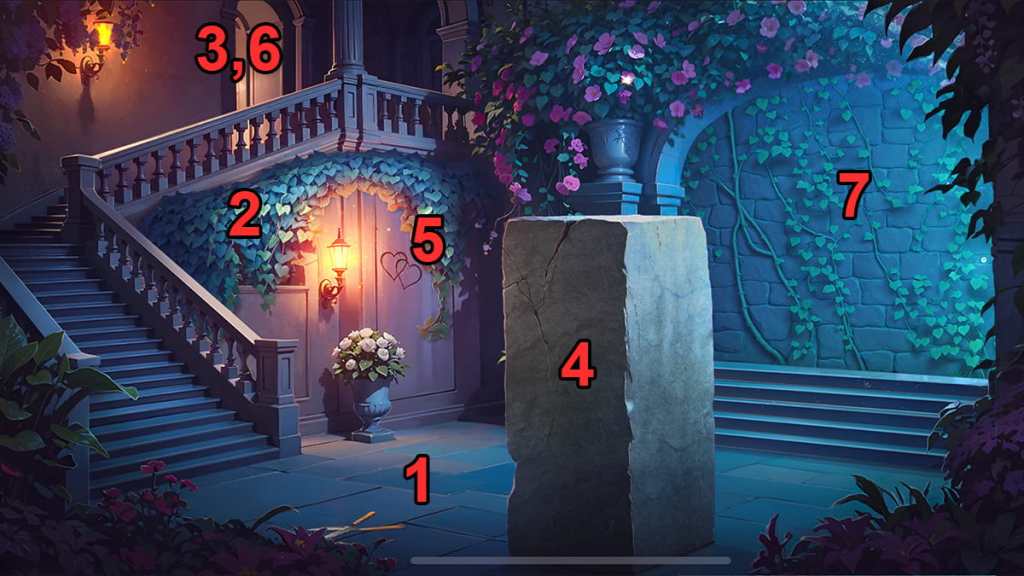
In the last chapter, Kate found a party invitation that led her and Melissa to a castle. However, they’re unable to get in, so it’s up to us to find a way in. Here are some first steps to doing so:
- Collect the stone from under the dirt pile near the tree.
- Grab the well handle near the well.
- Use the well handle on the well. Collect the bucket that appears.
- Use the bucket on the tree. Tap on the branch to collect it.
- Use the branch on the boulder blocking the door to find another stone and a dagger.
- Use the dagger on the vine-covered wall. Do the same with the patterned stone on the well.
- Grab the bucket again and use it on the water. Splash the water on the wall we just uncovered.
- Use your three stones on the wall section.

We now have a mysterious stone puzzle to solve. Starting with the two slots with outer designs as hints, your goal is to place each stone so that its sides match. You’ll find the solution to this puzzle below:

Once you complete the puzzle, you’ll find new cracks have formed around it. Use your dagger to break them and uncover the following codes:
- A down 1
- R up 1
- P down 3
- L down 5
You’ll also find arrows pointing to each clue. A down 1 has one arrow pointing down to it, R down 1 has two, P down 3 at three, and L down 5 at four. With these clues in mind, we can now unlock the castle door.

Head out of this menu and tap on the door. The first dial is already set to A, so you can tap it once to bring it to C. From here, take the second dial and turn it until it’s one letter above R. Repeat this using the hints above to get the solution, CLEF.

We’re now inside the castle’s wine cellar. Here’s a step-by-step guide to solving this area:
- Open the two hidden compartments in the wooden door and wall. Collect the ’04 bottle from the wall. Ignore the ropes for now.
- Open the drawer of the table to grab a wine opener. You’ll also find a ’91 bottle under the table.
- Use the wine opener to break open the panel in the stairs. Grab the ’89 bottle.
- Open the wine display. Place each bottle in its correct slot, depending on its year.


Completing this mini puzzle will reveal a hint, “00 79 89 96,” underneath the display. Find these four wine sections and count how many bottles are in each and what direction they’re facing. You’ll end up with the following answers:
- 00: Three down
- 79: Four right
- 89: One down
- 96: Three left

Now that we know the answer, tap on the door up the stairs and input this code using the arrow dial. Doing so will open the door, leading you to a room connected to the ballroom.

In this room, pick up the rope from the chair and tap on the purple curtain. Remember the heights of each chandelier. Now, head back downstairs and insert the rope into the door’s compartment from earlier.
From here, you’ll need to raise and lower each rope to match the chandelier heights. The image below shows the solution.

Completing this puzzle will reward you with a blue dress to wear to the party. Along the way, pick up the plaque and hidden star inside the closet. Remember the hat’s location.
With that done, head back upstairs and open the curtain to find the ballroom. From here, you can take the steps below to progress:
- Insert the plaque into the lion statue to claim some masks.
- Pick up the cane leaning against the table.
- Talk to the lady with the red dress. She’ll ask for a champagne flute, which you can find downstairs underneath the table. Give it to her to receive a dance card.
- Use the cane to grab the two hats on the bear wall statue.

Now that we have the dance card and two hats, we have three mini-puzzles to complete. To access the first, tap on the three pegs under the bear’s head. Place the masks on them before filling out the mask section of your dance card with the three symbols that appear.

Next, we’ll check out the animal painting next to the masks. Each animal has a colored bowtie. You’ll need to check out the lion statue and bear head’s symbols, alongside the eagle in the wine cellar. Here are each of their symbols:
- Lion: Crown, dark blue bowtie
- Bear: Swords, light blue bowtie
- Eagle: Cross, red bowtie

Our last puzzle involves the hats. Go to the hat from earlier and use your two hats on it. Selecting them will display colored ribbons and symbols. Jot this down on your dance card to complete it and begin a new puzzle.

You’ll now dance with three partners. Each dance has 12 steps that follow each partner’s symbol sequence, with each symbol appearing on a floor grid. You can only use each square once. You’ll find the answer to this puzzle below:

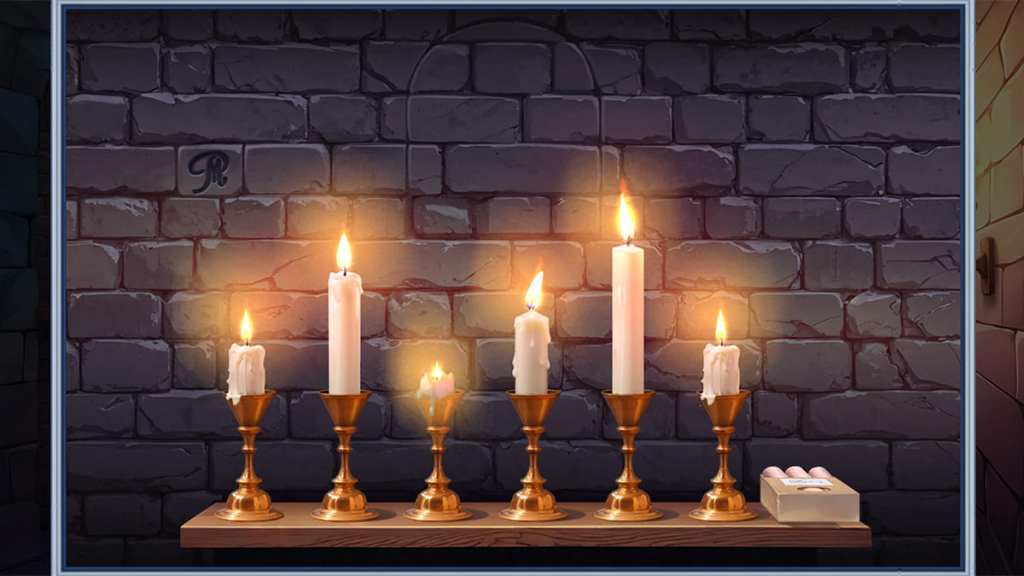
Following a cutscene involving Mark, we’ll find ourselves inside a dark room with scattered books and numbered shelves. Pick up the matches and light the candlestick to reveal four hourglasses. Tap on each hourglass to find two numbers, one on each half. One number shows how many books to put on each bookshelf, while the other reveals which shelf to place them on.
Using this information, we’ll place the books in the following locations:
- Shelf one: Three green books
- Shelf two: Four gray books
- Shelf three: Two blue books
- Shelf four: Six orange books

Solving this puzzle will immediately complete Adventure Escape Mysteries: Rendezvous’s fourth chapter, letting you begin the fifth and get one step closer to discovering Allie’s whereabouts.
Adventure Escape Mysteries: Rendezvous chapter five walkthrough
We’re now in a dungeon-like room. Start by picking up the sparkling torch on the floor and using the lit torch to ignite it. You can now use your handheld torch on the chandelier to light up the room.
Here’s a complete step-by-step guide to solving this first section:
- Clear away the debris pile. Pick up the stone that appears.
- Insert the stone into the hole next to the suit of armor. Grab the shield.
- Give the suit of armor the torch and shield. You’ll obtain a box of candles to use on the candleholders near where you found the shield.
- Reclaim the torch and shield before moving forward.

These candles are our first puzzle of this chapter. You’ll find the answer by looking at the cell door. The heights of each candle need to match these lines in the order they appear. Use your torch to light them. You’ll find the exact solution below.
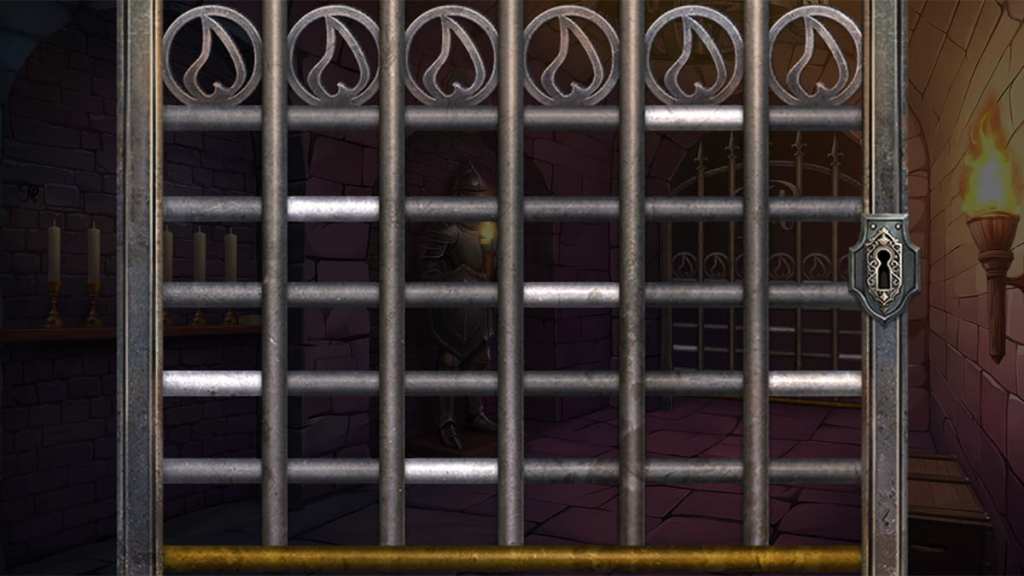
Once you complete the puzzle, light the final candle to obtain a key. Unlock the door to find a new area to explore. You can now take the following steps to escape this area:
- Insert the shield into the empty spot on the wall.
- Pick up the oar stuck inside the gate’s wheel.
- Pry the hammer out of the stone.
- Open the map unveiled in the first step and collect the hidden star from the bottom-left boat. Use your torch on the map to reveal the solution.

Using the torch on the map will reveal six directional arrows. Rather than looking from our perspective, we need to envision it as if we’re driving each boat and moving in the six directions shown. The only viable option is the one with 278 along its path.

Tap on the pillar near the wooden boat to find the puzzle that requires this three-digit combination. Tap each dial until you get 278 to unhook the boat.
With this done, return to the previous room and use the hammer to open the chest. Grab the sword and use it to break the box, giving you some building supplies. You can gain additional building supplies by placing the sword and torch in the suit of armor’s hands.
After reclaiming the torch and sword, return to the boat area and follow the steps below to progress:
- Use your sword on the net next to the staircase
- Repair the boat using your building supplies and an oar.
- Use the sword on the boulder to make a treasure chest appear. Remember this for later.
- Jam the sword into the gate’s wheel. Tap on the gate to move onto the next area.

With every new area comes additional items to collect. Here are some steps to take to tackle this section:
- Grab the broken pipe at the top of the stairs.
- Collect the hidden star on the wolf head.
- Return to the other area and reclaim the sword. Put the pipe inside the wheel instead.
- Use the sword on the pillar slot. Pull it to reveal a hidden section of the wall.
- Use the torch on the hidden section and collect the metal overlay. Pull the lever here to uncover another puzzle. Remember this puzzle for later.
- Reclaim your torch from the previous step.
- Tap on the cubes at the top of the staircase for another puzzle.

The key to solving this next puzzle is figuring out where each cube symbol is located. You can’t rotate the cubes, so you’ll need to use the process of elimination to determine their orientations before swapping each white dial. The easiest answer to start with is the top-left, as the top-right shows that the square is directly connected to the triangle and circle.
The picture below shows the solution to this puzzle:

Completing this puzzle will unveil a second one that we’ll tackle later. For now, return to the other area and head down the second path leading south. You’ll find a total of three keys, which you’ll need to fish out with your net. Use these keys on the treasure chest to receive some metal pieces.

With these pieces on hand, tap on the MP puzzle and place them in its display. You’ll now have to fit every piece into the letters. A small hint you can use is checking if your piece snaps into place when you slot it in. You’ll find the answer below:

You’ll receive a crossbow after completing this puzzle. Go through the tunnel where you found the keys and use your crossbow to shoot wooden boards on the ceiling. Every board has a symbol, which appears in the following order:

Before we can do anything with this information, we need to find some gems for another puzzle. Here are the steps to doing so:
- Head to the suit of armor from the first room. Give it the sword and crossbow to claim an MP pendant.
- Reclaim the sword and crossbow.
- Open the candle puzzle and place the pendant on the “MP” initials to obtain a ruby.
- Go to the map puzzle and place the pendant on the “MP” initials to obtain another gem.
- Place the metal overlay on the map. Remember “8147.”
- Go to the final area with your boat. Place the pendant on the “MP” initials next to the boat to collect an emerald.

We now have everything we need to solve the final puzzle. Tap on the sci-fi gate and insert all three gems. Input 8147 into the middle number orbs, and select the four symbols we found during the boat ride to unlock the final latch.

Opening this door will wrap up Adventure Escape Mysteries: Rendezvous’s fifth chapter. We’re now ready to press forward with the game’s sixth part.
Adventure Escape Mysteries: Rendezvous chapter six walkthrough
We’ve now arrived in a high-tech lab designed by Mark. Although Kate is confused, she’s determined to find Allie and figure out what’s going on. Here’s an initial step-by-step guide to advancing through this area:
- Break the yellow flask on the desk to collect broken glass.
- Tap on the purse and grab the metal piece.
- On this same screen, use the glass to cut open the zipper pocket to claim a yellow keycard.
- Select the center machine and scan the keycard.

Following these steps will open a cell with Camille and Luc inside. You’ll also find a hidden star under the bed. They’ll give you a blue keycard, which you can use to open the yellow door in the top-right corner of the area. Insert the blue and yellow keycards here to proceed.
From here, you can take some additional steps to learn more about your current situation:
- Collect the dyes from the table closest to the screen.
- Pick up the metal piece from the back shelves.
- Grab the hidden star on the same shelf.
- Activate the 3D printer in the center of the room.
- Tap on the display under the back shelves to start a puzzle.

For this next puzzle, we’ll need to combine pairs of blue squares to create numbers. They need to be in ascending order and can’t repeat. Right away, we can eliminate seven as an option, as no pairs combine to make it. With this information in mind, we know that 3-6, 8, and 9 are the numbers we need to make.
The picture below shows which squares you need to combine to finish this puzzle:

Inside this display is silicone and synthetic hair, giving you everything you need to use the 3D printer. Insert everything into the printer and tap on the face screen. Pick Allie to begin making a mask of her face before returning to the previous room.

With the mask on hand, use it on the scanner next to the large green gate to deactivate its lasers. You can now enter another new room and take the steps below to progress:
- Collect the paper from the desk.
- Press the red button of the terminal. Grab the red laser that surfaces.
- Tap on the camera monitors. Read the paper once the cutscene is done.

This next puzzle is a standard word search. In this case, you’re looking for the five numbers that are on Allie’s tracking code screen. The catch is that several of the numbers are unknown, so you’ll need to find potential matches using the limited information you have.
Below is a picture of each number on the word search screen and the final solution:
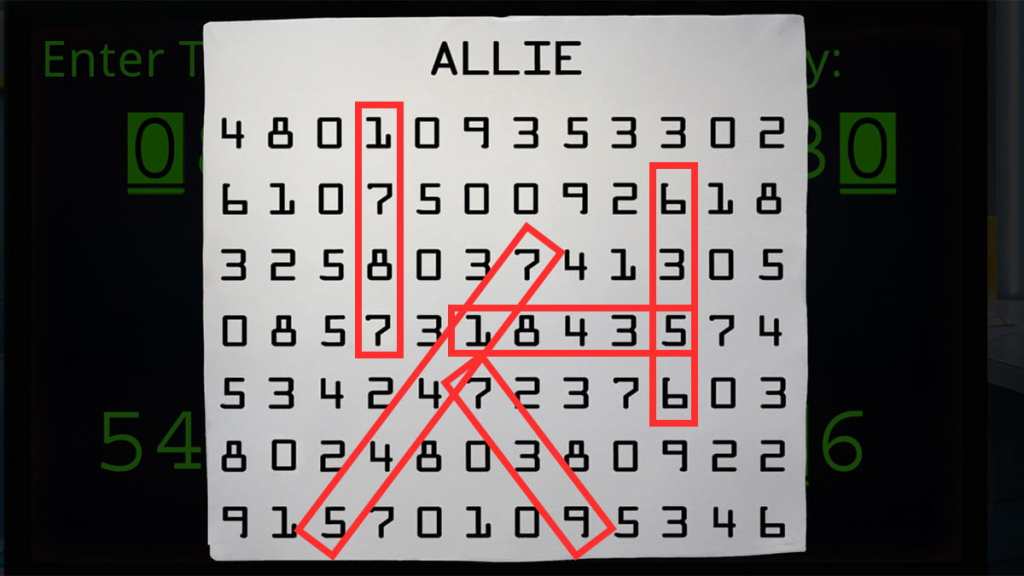
Once you input the five codes, you’ll learn Allie’s whereabouts. Along the way, a cabinet will open, revealing a blue button and a key. Grab both before plugging the blue button into the empty slot next to the red one. Pressing it will cause a blue laser to rise from the table for you to grab.
If you attempt to leave the room from here, red lasers will block your way, preventing you from escaping. A panel will also appear, which you can slot the red and blue lasers into to begin another puzzle.
There are two phases to this puzzle. The first requires you to move four green sensors so that they fall within the lines of the red and blue lasers. You only have three moves to get all four into the correct spots. You’ll find a working sequence below:

The next version introduces a purple sensor that has to be hit by both lasers at the same time. You have four attempts this time. The picture below shows the solution for the second half:

Completing this puzzle will lower the lasers, letting you collect a third metal piece. Leaving the room will bring you back to your starting point, where you can give Camille and Luc the key you acquired earlier. Dozens of numbers will appear on the walls, with a fourth metal piece falling from the ceiling.
Leave this menu and take the metal pieces to the screen next to their cell. You’ll encounter a cryptogram lock and several codes. It works like a normal cryptogram that has you deciphering letters based on their numerical equivalent, except this time, you’re converting other numbers to their coded counterpart.
The easiest place to start is the two sets of three-digit codes that end in 8. When searching through the grey numbers, “4” is the only number that appears multiple times at the end of each three-digit sequence, which translates to 8 in this cryptogram. Tapping on the light blue spaces lets you set each box to its respective number, making them easier to track.
From here, it’s a matter of using the process of elimination to determine each remaining number. The image below shows the correct sequence:

Completing this puzzle will activate another on the opposite side of the cell. The terminal will also turn into a black and white button, which you’ll need to activate a couple of times for the next puzzle. For this second puzzle, you’ll find six white and black shapes, which have matching pairs in Camille and Luc’s cell. Initially, the cell is bright with lights on. You need to activate the button to darken it, revealing the second half of the number set.
Below shows exactly what six numbers you’re looking for and the final number sequence:

Opening the cell will cause Mark to appear, wrapping up Adventure Escape Mysteries: Rendezvous’s sixth chapter and leaving us on a cliffhanger. It’s time to enter the final chapter and complete this storyline.
Adventure Escape Mysteries: Rendezvous chapter seven walkthrough
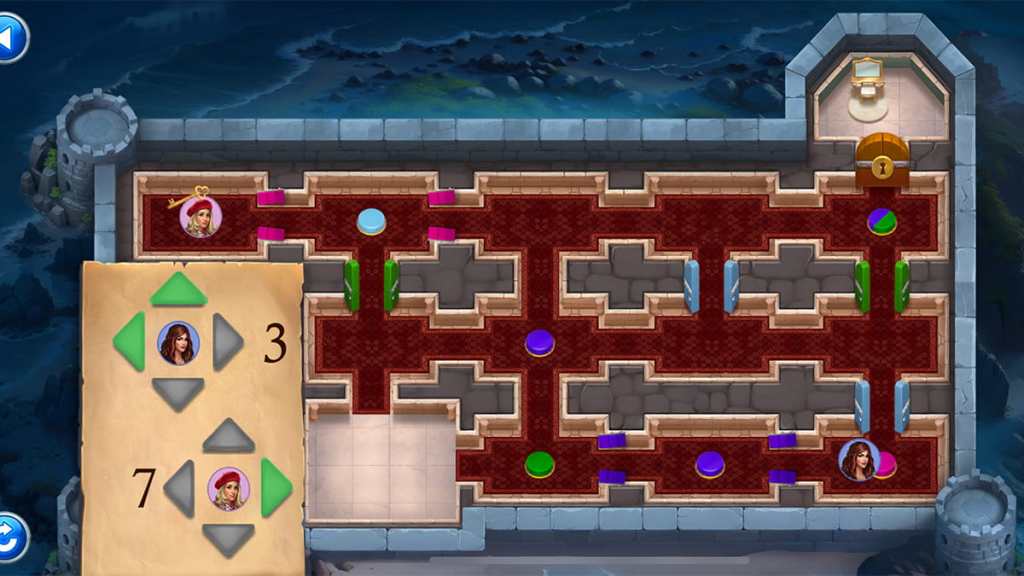
Following a lengthy conversation between Kate and Mark, we’re now ready to wrap up Adventure Escape Mysteries: Rendezvous’s story. Our first challenge is a maze puzzle involving Melissa and Kate.
During the puzzle, you have a limited number of moves between the two characters. You’ll need to step on colored buttons to unlock doors, with the overall objective being to grab the golden key and reach the top-right corner of the map.
Here’s a complete step-by-step guide to completing this puzzle:
- Move Kate right and up one space, followed by right two spaces.
- Move Melissa two spaces north.
- Move Kate one space down and one space north.
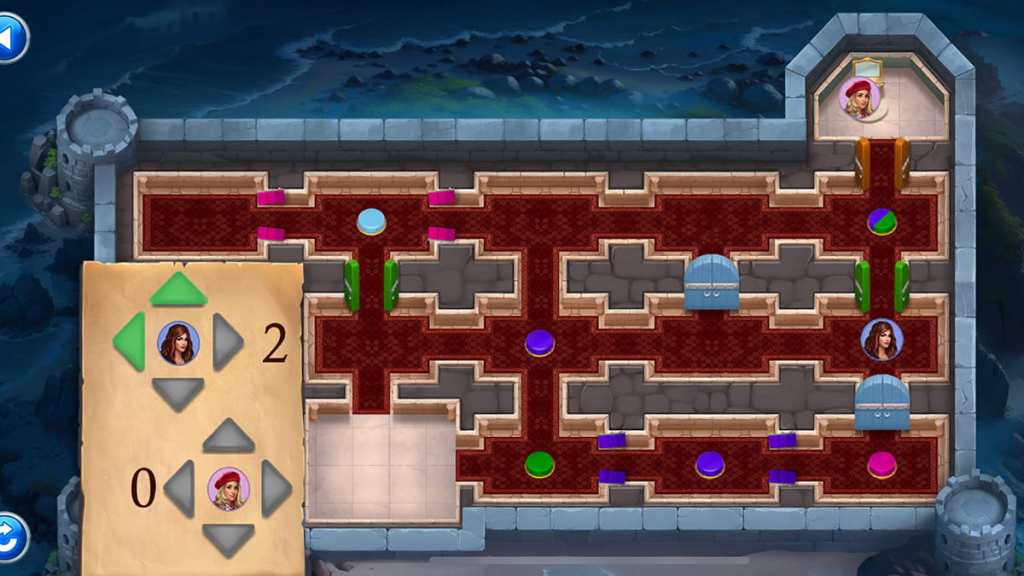
- Move Melissa left one space to grab the key.
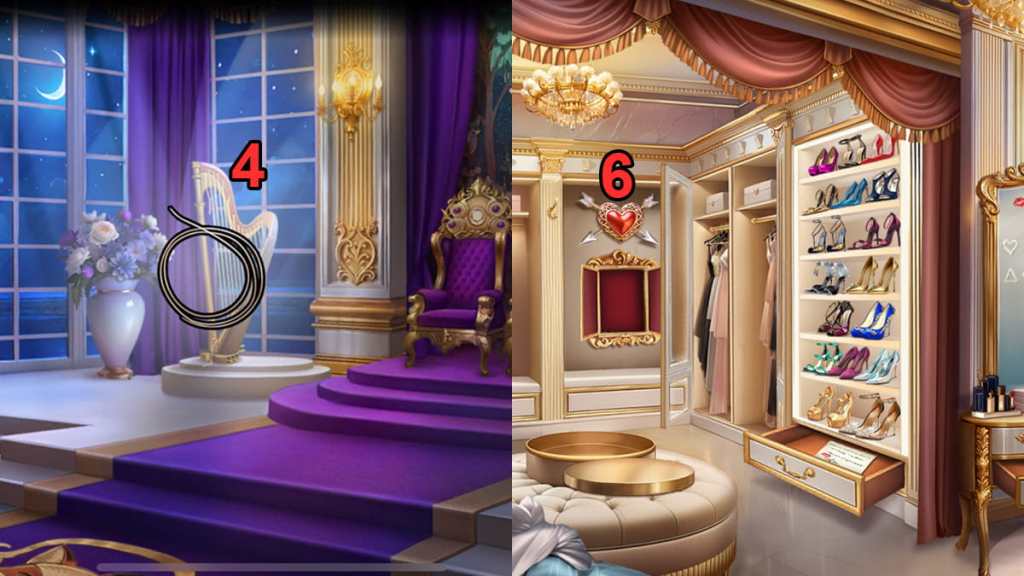
- Move Melissa three spaces right, one space left, then one space right again. Lastly, move her north to enter the dressing room.
- Move Kate two spaces north to the dressing room.
Right away, Kate and Melissa notice that there’s no Allie in the dressing room. Instead, you can find the following items:
- Open the vanity drawer to find a remote control. You can also move the stool to find a shoe.
- Move the curtain and the dress pile to find two more shoes.
- Tap on the cushion’s top to find a makeup brush.
- Grab the green dress at the back of the room to find a hanger. Use the hanger on the closet to find a fourth shoe.
- Place all four shoes on the shoe shelves to unlock a drawer containing a note and key.
- Use the key on the vanity drawer to obtain some makeup powder.
- Use the remote control on the ornate panel next to the door to find a ring collection.
- Tap on the mirror. Use the makeup powder on it to uncover a clue. Remember the fox.

We now have everything we need for the ring puzzle. Starting with a heart-shaped ring, you’ll follow the arrows to each adjacent ring until you find its endpoint. The shape of this endpoint is what you’ll input into the door’s combination lock. You’ll need to repeat this three more times to uncover all four answers.


We’re now inside a giant throne room. Remember the foxes for later. For now, tap on the thrones and focus on the left one. The rings around each pink button determine the order in which you press them. Start with the top-right button and move down, up diagonally, then down again to receive a gold pendant.

Alongside the pendant, you’ll also find the answer to the right throne. Since the triangle is on the bottom in the answer, orient the answer around this. You’ll receive another gold pendant for your efforts.

Once you finish both puzzles, move the purple curtain to the right of the thrones to uncover two empty circles. Insert the pendants inside to reveal another puzzle. This time, we need to take a look at the foxes.
Each fox—the three from the throne room and one in the dressing room—has distinct traits. They’re differentiated using the following in-game hints:
- An orange-faced fox.
- A fox face with a light streak down its nose.
- A gray fox face.
- A light colored fox face.
Every fox face is also surrounded by specific golden patterns that you’ll need to match within the puzzle’s display. You can determine their order by looking at the tapestry and counting how many of each fox is within the picture. Doing so reveals that you’re one orange-faced fox, two gray foxes, three light streak nose foxes, and four light-colored face foxes.
With these hints in mind, we can deduce the following solution:

We’re now inside a garden. Here are the steps you’ll need to take to progress:
- Pick up the shears on the ground. Use them to cut the vines next to the staircase.
- Grab the chisel hammer and use it on the block of stone to transform it into a Cupid statue.
- Head into the throne room. Use the shears on the harp to obtain some string.
- Attach the string to Cupid.
- Grab the arrow from the two hearts on the wall.
- Return to the dressing room. Place the arrow on the red heart at the back of the room.
- Grab the heart necklace. Use it on the Kate statue.
Completing these steps will reveal a combination lock under the statue. Return to the throne room and use the shears on the tapestry to reveal the answer to this puzzle. Every colored line creates various shapes, which we can input into the lock based on how they combine. Below shows the solution to the lock:

We’ve officially unearthed the bomb Mark planted in the castle. To finish this puzzle, you’ll need to move each chip so the connected chips have different colors and shapes. It takes place over multiple rounds, with the first only having two moves. Here’s a step-by-step guide for the first sequence:

This was just a tutorial round. Now, we have a much larger array to work with. For this round, there will be one connection that shares a characteristic. You’ll need to cut the wire between these using your shears. Fortunately, you have 50 rounds to complete this one when you only need around 20. There are also multiple solutions to it.
Here’s an example of a solution you can encounter while completing this puzzle:

Finishing this puzzle will end in one final cutscene, wrapping up Rendezvous and readying you for Feline Frenzy alongside future Adventure Escape Mysteries storylines.


 – AtopGames")
 – IGN")