
New York Mysteries 4: The Outbreak continues your adventures in 1960s New York, where our main character, Laura, is investigating a disease spreading around the city. The story takes place over several regions, requiring you to solve dozens of puzzles to learn more about the world’s circumstances.
Let’s dive right into a complete walkthrough of New York Mysteries 4: The Outbreak, including every item you need to find to progress through each part.
Complete New York Mysteries 4: The Outbreak walkthrough
You’ll initially start your playthrough by listening to the narrator, Laura, describe the events leading up to the present day. Turns out, she’s been kidnapped, and it’s up to us to get her out so she can explore the city. These events lead up to the game’s tutorial within the first area.
Tutorial room
After you wake up in a mysterious party room, you’ll decide whether to start an optional tutorial. This tutorial will guide you through how to exit the room, but in case you skipped it, we’ll briefly explain how to complete it.
Here’s a complete step-by-step to leaving the tutorial room:
- Tap on the table next to the door.
- Sift through its drawers until you find a key and pliers.
- Leave the leave and tap on the blue handkerchief table. Take its ring.
- Open the wardrobe in the back corner of the room.
- Clear away the clothes until you obtain a hanger.
- Tap on the hanger in your inventory and use the pliers on it to obtain a thin tube.
- Use the thin tube on the door to escape.
Congratulations, you’re now out of the tutorial room and into the rest of the map. It’s time for the real challenge to begin. Before leaving, though, take note of the Mask puzzle next to the wardrobe. You don’t need to do anything with this yet, but we will be returning to it later.
Park walkthrough
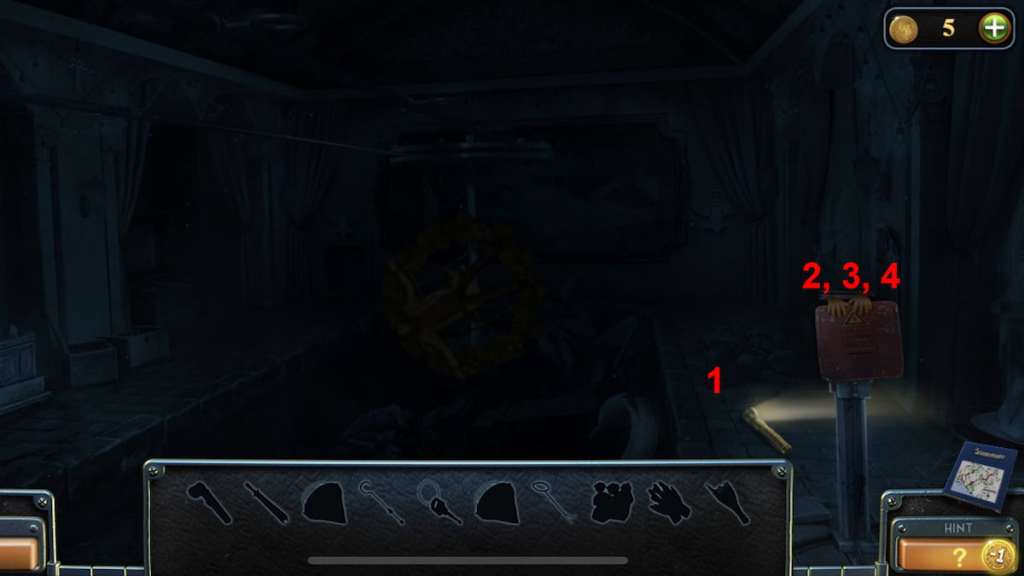
The first part of New York Mysteries 4’s starting area begins immediately after leaving the tutorial and entering an abandoned carnival zone. You’ll have multiple spots to interact with, including a back gate leading out of the park and a river to the right.
First, we’ll start in the area to the right. Tap the right side of your screen to enter an area with a river and a swan boat. From here, we can solve the first set of puzzles using the steps below:
- Tap on the swan boat and clear everything away to obtain a crochet and a flashlight.
- Select the pile of papers to the right of the swan boat to uncover a magnet.
- Tap on another pile of papers on the pier. Clear away its paper to uncover a mask.
- Use the crochet on the mask to obtain one of five mask tokens.

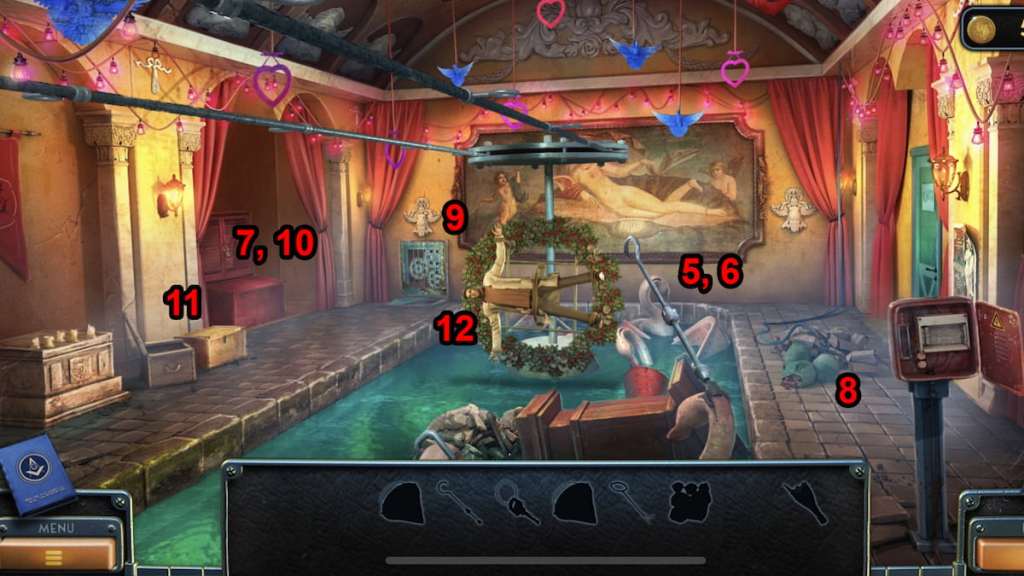
Now that we have several helpful items from this first region, it’s time to head to the opposite side of the region. Go back to the carnival area before clearing away some balloons to reveal a side gate. From here, take the following steps to uncover more secrets:
- Select the car and tap on the sun visor to discover your first game piece.
- Tap on the green game piece on the car’s seat.
- Select the red handle under the steering wheel to open the car’s trunk.
- Tap the open trunk and collect the wrench on top of the box.
- Leave this window and enter the archway. Pick up the game piece on the ground. Remember the bag in the water for later.
You’ll also spot a record on the ground near a bench and your first morphing object atop the metal fence.

Now that we have several helpful items from these regions, we’re safe to return to the original carnival area. Use the arrow at the bottom of your screen to return here before taking the following steps to solve the next set of puzzles:
- Tap on the brown coat on the carousel. Select its pocket to obtain another Mask token and a game piece.
- Enter the code 413 on the bag to claim a car key.
- Tap on the broken carousel horse. Use the magnet to obtain a key.
- Use the key to unlock the wooden door above the carousel horse.
- Tap on the hat to find another game piece.
- Select the silver and gold grate to find a ball puzzle.

Although the puzzles to this point have been tricky, this is the first one you can very easily get stuck on. By pressing the two arrow buttons on the left and right sides of the circle, you’ll rotate it, allowing the balls to roll through its paths. Below is the sequence you need to solve this puzzle:
- Left, right, left, right, right, left, right, right, left, right, right, left, right, left, right, right

That’s quite the mouthful. Overall, your goal is to lead the orange balls into dead ends so the silver ball can smoothly roll across the path. Once you complete the puzzle, you’ll obtain a Hook-and-loop to use later.
By now, you should have all five game pieces, two tokens, and five other objects from previous steps. You now have the means to solve the puzzle box in the car’s trunk. Interacting with this will begin a colored train puzzle, which you complete by tapping each train to send it along a straight path. Here’s a complete list of which trains to select for the first sequence:
- Yellow
- Red
- Teal
- Yellow
- Red
- Green
- Blue
- Red
Afterwards, you’re met with a second sequence. Here’s a list of which trains to select for this one:
- Red
- Teal
- Blue
- Green
- Yellow
- Teal
- Blue
- Green
- Yellow
- Red
- Teal
- Blue
- Teal
It’s not over yet, though. There’s another sequence you’ll need to complete. Below is the exact solution:
- Blue
- Yellow
- Teal
- Blue
- Yellow
- Red
- Green
- Yellow
Completing this puzzle will reward you with a handle for the car’s glove compartment. Using the handle on the glove compartment will give you a mask token, bringing your total up to three of the five we need.
While you’re in the car, use the car key to turn on its lights. You’ll now see a rusted metal box with a latch you can open. Open it before using the wrench to unscrew its bolts, revealing a screwdriver inside.

It’s time to return to the tutorial room. Use the screwdriver on the music box in the room’s center to obtain a battery, which you can then combine with the flashlight before returning to the swan boat. Using the Hook-and-loop will initiate a cutscene, letting you start the second half of this story section.
We’re now inside a sewer, with multiple hidden objects to find. Here’s a complete step-by-step to solving this area:
- Pick up the flashlight on the ground.
- Use the flashlight on the electrical box before grabbing the gloves and power breaker.
- Use the power breaker on the box and the gloves on the wires.
- Connect each wire to light up the area.
- Pick up the Hook-and-loop.
- Select the broken swan boat behind Travis and use the Hook-and-loop to receive a bucket.
- Tap the red box on the left side of the area, open it, and scoop up some sand with the bucket.
- Extinguish the fire on the right side of the screen before picking up the stones and a key.
- Select the grey box next to the red one. Open it and toss the stones inside.
- Tap on the red box again to use the key on its padlock. Pick up the pole hook here.
- Go to the wooden box next to the red one. Use the pole hook to open it and claim a broken bottle.
- Use the broken bottle on Travis.
After talking to Travis, you’ll now focus on crossing the river and wrapping up this area. In particular, you’ll spot a broken statue in the water on the right side of the screen. Select the statue to claim a metal rod.

Now, you have everything you need for two different objectives. Here’s a breakdown of each step from here:
- Head to the carousel area, tap on the seesaw, and use the metal rod on it.
- Hit the rod with the nearby brick. Claim the long wooden board.
- Return to the car area, enter the archway, and use the pole hook on the bag in the water.
- Open the bag to receive a coin and machine oil.
- Use the oil on the rusty box’s gears. Press the button to activate them.
- Return to the Swan area. Tap on the record above the broken statue’s location.
- Use the wooden plank on the pier.
- Tap on the box next to the heart gate. Use the crochet on it to claim a mask token.
- Select the hammer minigame on the opposite side of the gate. Use the middle hammer to claim the final mask token.

With all five mask tokens on hand, return to the tutorial room and activate the mask box from earlier. Use the five tokens to begin a minigame. Your goal is to arrange them so there’s no repeating emotions or color in each row and column. The image below shows the exact solution.

You’ll receive a token upon completing the puzzle and opening its box. One of two things can happen from here: either you will automatically initiate a cutscene, or you’ll be stuck in this room.
If you’re stuck in the room, head to the previous area, insert the token into the fortune-telling machine in front of the carousel, and open its prize to obtain a gear. Bring this gear to the car area’s rusty box and activate its machinery to open the gate, letting you progress into the next area.
With that out of the way, we’re now officially done with what we can consider the game’s first chapter. Let’s head into New York Mysteries 4’s second of many parts.
Cathedral walkthrough
The beginning of this second chapter has Laura and Travis traveling to a cathedral. Here’s a step-by-step to starting in this new area:
- Tap on the plaque on the left side of your screen. Insert your ring into it.
- Tap on the four-leaf clover above this plaque to find another collectible.
- Select the bike in front of your car to grab a button.
- Tap the newspaper vending machine next to the cathedral’s door. Insert your coin to receive a newspaper.
- Clear away the paper on the ground next to the newspaper machine to find another button.
- Tap on the window above the cathedral door to obtain a morphing object collectible.
- Select the tent next to the newspaper vending machine.
- Flip over one of the circular fabrics to find a key. Use it to unlock the door.

While many of the early steps lead to you discovering puzzles, you won’t be able to solve them yet. Instead, you’ll need to start with the door we just unlocked, where you’ll find St. Patrick’s Day-themed items. Here’s a complete list of objects you’ll need to obtain:
- Hairpin: Inside a beer mug on the counter.
- Spectacles: Atop a typewriter.
- Green hat: On the counter.
- Blue clover: Inside the green hat on the counter.
- Key: Under the green hat. Use the hairpin to grab it.
- Lever: Inside a wooden box on a shelf. Use the key to unlock the box.
- Typewriter code: Inside a book on the counter.
- Green clover: Inside the typewriter. Use the lever on it and type in “4726,” the book’s code.
- Yellow clover: Above the typewriter.
- Beard: Next to the leprechaun on one of the shelves.
- Purple clover: Inside the leprechaun’s pot. Place the hat, beard, and spectacles on the leprechaun to open this container.

Now that you have all four clovers, select the statue encased in glass and place all four in their respective slots. You’ll receive the Figurine of St. Patrick, which you can now use to solve a puzzle inside the cathedral.
Once you’re ready, enter the cathedral to find a wall of statues with one empty slot. Place the Figurine of St. Patrick and the two buttons you found previously to begin the puzzle. From here, you can put the newspaper on the left wall to show you the correct order. Below is the completed figurine wall:

Once you solve this puzzle, the cathedral will open, allowing you to venture inside and investigate further. Below is a step-by-step to revealing more puzzles within the cathedral:
- Tap on the morphing object to the right of the stairs.
- Open the door that’s to the left of the morphing object. Pick up the lens on the bench.
- Staying in this room, select the wooden panel next to the bench. Open it to claim an Atlas Statue figurine and a drawing with keys. Remember the number panel for later.
- Select the telescope in the center of the room. Grab the second lens here.
- Go to the candle altar at the back of the room. Tap on the front and back row candle holders until you pick up two more lenses.
- Tap on the statue next to the piano to obtain another collectible.
- Select the piano to find a fifth lens and a clip on some music sheets.

Before you can obtain your sixth lens, you’ll need to use the drawing with keys on the piano. From here, follow the sequence by sliding your finger, mouse, or stylus across the top and bottom keys in the direction the image shows. Doing so unlocks a cupboard containing another lens.

The seventh and final lens is outside of the cathedral, inside the bicycle. Select it and use the clip to open its pouch, letting you obtain the lens and a wrench to use later. Along the way, go back to the plaque from before and insert the Atlus Statue figurine inside. We won’t be tackling this just yet, but keep it in mind for later.
Before you can activate the telescope, you’ll need a battery to power it. Head inside the car, open it, and disconnect the wires. Now, you can use the wrench on it to obtain a battery. Bring it and your seven lenses inside the cathedral to activate the telescope.

Upon activating the telescope, you’ll find a rainbow ring and, initially, the cathedral’s wall. Tap on the rings until you find a constellation screen with three bright stars. Your goal is to create constellations containing only these stars, making sure not to include any that are off to the side of your screen.
To solve this, tap on every color except yellow, red, and magenta. These will create three constellations, rewarding you with a map of the starry sky.

Now that you have the map, you have everything you need to solve the plaque puzzle from the previous steps. Head outside, select the plaque, and use the map on the center circle. Now, you have it on hand as a reference.
There are three components to this puzzle:
- Moving the circle (red handle)
- Rotating the constellations (orange wheel)
- Zooming in and out (slider on top-left corner of your screen)
Using these three controls, move the constellation’s screen around so it matches the map. Upon completing it, you’ll receive the answer to the number pad puzzle inside the cathedral: 573353.

Now that you have another set of numbers, head back inside the room with the bench. Use all six numbers on the numpad inside the wooden panel to initiate a cutscene.
Order walkthrough
Your next objective after entering the Order is to find a way to access the laboratory. Here are some steps you can use to start this process:
- Tap on the feather on the desk to obtain a collectible.
- Select the umbrella stand in front of the desk to get the first of ten keys.
- Tap on the red cushion to find a lighter. Keep the miscolored patch in mind for later.
- Open the desk and interact with the top two drawers. You’ll find a key, precision screwdriver, and a candle.
- Select the table on the right side of the screen to collect a Medallion of the Order.

Since you need two candles for each candlestick, we’ll ignore this part for now. In the meantime, head into the blue doorway to discover a library. Here are some steps to uncover its items:
- Collect the record between the two right bookshelves.
- Collect the morphing object near the top of the bookshelves directly above the wooden door.
- Tap on the umbrella on the bookshelves on the right side of the room.
- Select the desk at the back of the room. Collect the dry wick, compass figurine, and small piece of paper from atop the desk and the green key from the drawer.
- Select the drawers to the left of the desk chair. Collect the “parts of the scheme” paper from under the sheet. You will also find another key under a book.
- Tap on the glass box. Use the ring on its metal latch to obtain a red snake key.

Although there’s more to do in this room, we first have to leave the area and go back to the main foyer. Before leaving, use the compass figurine on the Medallion of the Order to insert it into place. Although this doesn’t complete the puzzle, it’ll help you clear out your item list slightly.
By now, you should have the following items:
- Ring
- Lighter
- Medallion of the Order
- Four colored keys
- Precision screwdriver
- One candle
- Umbrella
- Dry wick
- Paper
- Red Snake Key
- One of three “Parts of the Scheme”
In the main foyer, use the umbrella on the dinosaur skeleton to obtain another key. You’ll also gain a sharp tooth, which you can use to cut open the miscolored cushion from earlier. Do this to claim a second “parts of the scheme” paper and a cotton ball.

Now that we have some extra items, go back to the library and return to the taped book on the desk. Use the sharp tooth to cut it open, letting you claim a part of the mosaic item. We can now return to the main foyer once more for another puzzle.
More specifically, you want to interact with the candle table from before. Now that we have part of the mosaic, we can place it inside the table and complete a miniature puzzle. The easiest way to complete this is to move each curved piece into its respective corners before connecting the lines with the remaining portions so they create a token-like circle. Completing this puzzle will reward you with a second candle.

Now that you have both candles, place them inside both candlesticks on this table. Your next goal is to align each candle so that the height of each side matches.
Starting with the left candlestick, arrange them in the following order, starting from left to right:
- Second-tallest candle
- Shortest candle
- Tallest candle
- Second-shortest candle
Next, we have the right candlestick. Arrange each candle in the order below, starting from left to right:
- Second-shortest candle
- Shortest candle
- Tallest candle
- Second-tallest candle

Finishing both puzzles will open a compartment in the table, revealing a hint to another puzzle. With this hint on hand, tap on the wooden box next to the table and use the paper on its display as a reference. The key is counting each clover leaf for the answer.
Counting each will give you an answer of 6245 if you begin from the top-left dial and move clockwise. Inputting this code will let you open the box, allowing you to collect a shotshell, a sixth key from within the red drawers, and tweezers from inside another wooden drawer. Use the paper you picked up previously on the shotshell to receive paper with powder.

It’s time to swap back to the library once more. With the tweezers on hand, go back to the desk and toss both the dry wick and cotton ball inside the kerosene flask. Pick both up using your tweezers to receive cotton soaked in fuel and a wick. Use the fuel-soaked cotton on the lighter in your inventory.
At long last, we’re ready to blow up and unlock the lab’s door. Use your paper with powder, wick, and lighter on it to unlock the door, letting you enter the Order’s lab and meet your next character.
Order: Laboratory walkthrough
After finding Bishop and talking to Travis more about the current situation, you’ll officially be ready to explore the laboratory in hopes of developing a healing serum for the currently ongoing epidemic as part of New York Mysteries 4’s storyline.
Here are some initial steps you can take in this new room:
- Tap on the record under the debris to Travis’ left.
- Select the white lab coat next to Travis. Grab the green key out of its pocket.
- Select the desk’s drawer that Travis is at. Use the scalpel to open it, revealing a letter, an orange key, and a UV lamp.
- Tap on the sink above where you found the record. Collect the purple key, a scalpel, the third Parts of the Scheme, and the photo development liquid.
- At the sink, tap on the gray tray to set it inside the sink. Turn on the faucets to fill it with water before collecting it as a photo tray.

Now that we have all three parts of the Scheme, you can interact with it in your inventory to piece it back together. Place the Scheme inside the photo tray before using the photo development liquid on it. You’ll restore the page’s colors as part of a later puzzle.
By now, you should have the following items in your inventory:
- Ring
- Medallion of the Order with the Compass Figurine inserted inside
- Nine keys
- Red Snake Key
- Scalpel
- Scheme
- UV Lamp
Within the lab, you’ll notice a green locked door above Bishop. Leave the room and go back to the library before using your scalpel on the globe. Doing this reveals a door key inside it, which you can use to open this door and access a storage room.
As you open the room, you’ll have a list of 15 items to collect. Below is every item and their locations:
- Model of a molecule: Atop the fridge
- Tweezers: Inside the white box on the wall next to the fridge.
- Bromine: Inside the white box where you found the tweezers. Solve the puzzle to reveal “Br,” the symbol for Bromine.
- Set of weights: Interact with the desk. Open the drawer for the first weight and a handle. Attach the handle to the second drawer and open it to collect the fourth weight and complete the set.
- Iron: Interact with the desk’s magnifying glass and find “Fe” on the periodic table.
- Salt: Read the book atop the desk. Open the fridge and move the flasks around until you find two labeled “Na” and “Cl.” Pour both into the beaker to collect some salt.
- Syringe: Inside the fridge.
- Metronome: Atop the bottle shelves above the desk.
- Atom: Tap on the bottle shelf above the desk to find a picture of an atom.
- Dartboard: Directly above the metronome and atom on the wall.
- Mortar: On the metal desk to the left of the fridge. Move the large green bottle beside the hamster cage to reveal the mortar and pestle.
- Microscope: On the same metal desk as the mortar.
- Scale: Directly above where you found the mortar.
- UV Lamp: Next to the scale.
- Gloves: The first is above the stove hood inside a vent fan. The second is inside the suitcase on the floor.

Once you find all 15 items, you’ll receive a UV light bulb to use on the lamp in your inventory. Open the glass cabinet in the center of the lab and shine the UV lamp on its bottles. Move the lamp to the bottom-left and middle-right shelves to make two bottles glow, allowing you to collect two chemical agents.
Give what you have to Travis to initiate a cutscene. He’ll give you the tenth and final key you need for another puzzle. Leave the lab and interact with the ornate wooden door to the lab’s right. You’ll spot ten empty slots, which you can use your keys on to activate. Now, use your Scheme to officially begin.
The objective of this puzzle is to move each key along the paths using each blue button. For example, pressing the leftmost button will swap the orange and green keys, as those are the two connected to the vertical line.

The best strategy to use for this puzzle is to focus on one key at a time, starting from either the left or right side. Since the pink-red key is at the end of the path, move it along using the button until it reaches its bottom-left slot to match the Scheme. Repeat this with purple, yellow, green, and the rest that follow until you reach the end. Once they’re in the right spots, tap on each one until their arrow’s direction matches that on the Scheme.
Once you complete the puzzle, another door will unlock, revealing a massive storage room with a “G” that matches your Medallion. Tap on the glass display on the far end of the room and use your ring on its lock. You’ll unlock the display, letting you obtain Elbaite for Travis. Several cutscenes will ensue, revealing some important information about New York Mysteries 4’s story.
Order: Security and mail room walkthrough
With that plot twist out of the way, Bishop will immediately tell us our first objective: get through the Order’s vent system to access the security room. Tap on the crowbar on the floor in front of the dais before selecting the vent to the right of the “G.” Tap on the boxes to stack them before using the crowbar on the vent.

Upon entering the vent, you’ll have several branching paths, with most of them leading to dead ends. Here’s the exact path you’ll need to take to reach the end:
After reaching the end, you’ll find a second vent with a wire attached to it. Grab it before tapping on the latches along the vent’s corners to unlock it, letting you access the security room.

Inside the security room, you’ll have another set of items to obtain, with dark outlines being your only hint for what to find. Below is a list of every item and its locations:
- Umbrella: Leaning against a half-wall next to a plant.
- Ruler: On the desk next to the typewriter.
- “7″ Key: Inside a fan at the top of the room. Use the umbrella and ruler to stop the fan’s blades and retrieve the key.
- Paper clip: Inside the “7” mail slot. Use the 7 key on the slot to open it and grab the paper clip from the envelope.
- Coin: Inside the “1” mail slot. You don’t need a key to open it.
- Key: Tap on the camera screens on the left side of the room. Use the coin on the speaker to unscrew its bolts, letting you grab the key from underneath.
- “5″ Key: Inside the drawer at the desk. Use the key from above to open it.
- Phone speaker: Tap on the telephone on the desk. Take it apart to obtain “speaker from a telephone.”
- Calendar: Inside the “5” mail slot. Use the 5 key on the slot to open it and claim the calendar.
- Key card: Use the phone speaker on the broken camera speaker. Attach the wires to the phone before pressing the red button. Bishop will tell you the key card is under the typewriter, letting you use your paper clip to access it.

By the end of it all, you should have the key card and calendar on hand. Tap on the keycard reader next to the door to start your next set of puzzles. By looking at the calendar, look for four numbers circled in red ink rather than blue. These four digits, 1458, are the passcode you need to punch into the keypad before swiping the keycard.
Inserting this code will reveal a second puzzle. Your goal is to turn off every chip on the display by tapping on each light. When you select one, it’ll turn on or off while activating those directly adjacent to it. Tap on the following lights to finish the puzzle:
- Second row, first column
- Second row, fifth column
- Fourth row, first column
- Fourth row, fifth column
- Fourth row, third column
- Fifth row, fifth column

After pressing all six buttons and tapping the red button, you’ll leave the storage room and reunite with Bishop. After a brief conversation, he’ll give you a green snake key. For now, though, we’ll focus on the storage area we were just in.
Within the storage room, you’ll find several cardboard boxes in the bottom-left corner of the room, directly to the right of some pallets. Move the boxes to find some rubber gloves. Now, by selecting the hook near the room’s ceiling, you can open its panel and use your gloves to attach the wire. The hook is now operational, allowing you to move heavy objects with it.

After selecting the hook again and activating its directional arrows, move it right before letting it descend. It’ll grab a metal cart, which you can tilt up to reveal a roller. Grab it before returning to the Order’s library. Use the roller on the ladder to move it, letting you access a peculiar snake chest.
Fortunately, we have the two keys needed for this chest. Use them to open it, letting you read a book and collect a key. Open the library’s door with the key to access a mailroom.
Here are some steps to take after entering the mailroom:
- Tap on the right wall of the mail slots. Select box 42 and sift through the envelopes until you find a videotape and a door handle.
- Select the table and chair at the back of the room. Pick up the playing cards and a portrait. Remember the time on the pocket watch, 3:55.
- Select the wooden boards in front of the door. Pick up the lock pin.
- Tap on the closed door at the back of the room. Attach the door handle to it.

Before heading into this newly unlocked room, enter the one next to it. Here, you’ll find a presentation room that houses the following items:
- Glue on a chair’s armrest.
- Dry rag on the easel.
- Pointer next to the easel.
- Roller inside the red box. Use the playing cards to unlock the box’s door.
- Feather collectible on an armrest.
- Morphing object underneath the chairs.

We’ll be returning to this room a few times. For now, with these new items on hand, it’s time to enter the second room. You’ll find all kinds of equipment that you’d expect in a movie theater. Here are some extra items to pick up within it:
- Grab the four-leaf clover collectible at the top of the room, above the large wooden wardrobe.
- Tap on the morphing object in the rolls of fabric on the right side of the room.
- Pick up the sliding ladder from the center of the room.
- Select the movie projector to find a hammer and a visual guide for fixing the projector. Putting some items in here now is optional.
- On the movie projector screen, open the wooden board on the wall to find a light bulb.
- Tap on the lamp near where you found the sliding ladder. Take out its bulb and replace it with the one you just found.
- Select the area that’s now lit up by the lamp. Tap on the puzzle box on the right side of the screen.
- Take the portrait from your inventory and place it inside the empty circle.

It’s time for another puzzle. Using any of the three portraits on the board, your goal is to move one of them onto the golden circle near the top of the screen. Here’s a complete step-by-step to doing so:
- Starting with the bottom-right portrait, move it up and right so that its diagonal is the golden circle. You’ll find this indicated with the blue arrow.
- Next, take the top-left portrait and move it right, up, right, and down. You’ll find this indicated with the red arrow.
- With the third portrait, move it up, right, up, and right so all three are in a straight, vertical line. You’ll find this indicated with the green arrow.
- Move the middle portrait to the left.
- Slide the top portrait down one square.
- Slide the leftmost portrait to the right so it lands on the golden circle.

You’ll find a minute hand inside that you can use on another puzzle in the mailroom. Save it for later, though, as we’ll knock out the entire puzzle once we obtain every hint for it. Instead, use the hammer you found in the previous room to detach the broken floorboards, which will allow you to access another room.
Much like the science lab, you’ll need to find 15 objects within this room. Below is every item and their locations:
- Medallion: Underneath the hat on the chair.
- Smoking Pipe: Inside a cardboard box. Tap on the desk, open its right drawer, and use the knife on the cardboard box to find the pipe.
- Feather Pen: Inside a book on the desk.
- Vinyl Record: Under the record player’s top.
- Idol: Inside the desk’s right drawer.
- Monocle: Inside the middle drawer on the desk. Open the book above it to find a key, which you can use to open the drawer.
- Inkwell: Atop the desk.
- Binoculars: Above the desk, atop the windowsill.
- Statuette: On the scroll shelf.
- Compass: Underneath an abacus on the desk.
- Spyglass: Underneath the desk.
- Stethoscope: On the scroll shelf.
- Brass Pipe: Underneath a plant at the top-left corner of the screen.
- Envelope: Behind a painting above the desk.
- Football: Inside a blue box on the shelf next to the scroll shelf.

Once you find every item, you’ll receive a projector lens, which you’ll need for the broken projector in one of the previous rooms. Before returning here, though, head back to the science lab, open the sink, and use the dry rag on it.
With a wet rag on hand, head back to the movie theater room and combine your lockpin and sliding ladder. You can now access a window, which you’ll need to clean off with your wet rag. You’ll find another clock puzzle hint, 2:55.

You’ll then encounter your third and final clock hint by heading back into the projector room. Tap on the desk where you found the portrait puzzle and clean the coffee stain with the wet rag to find a clock with 12:40 as its time.

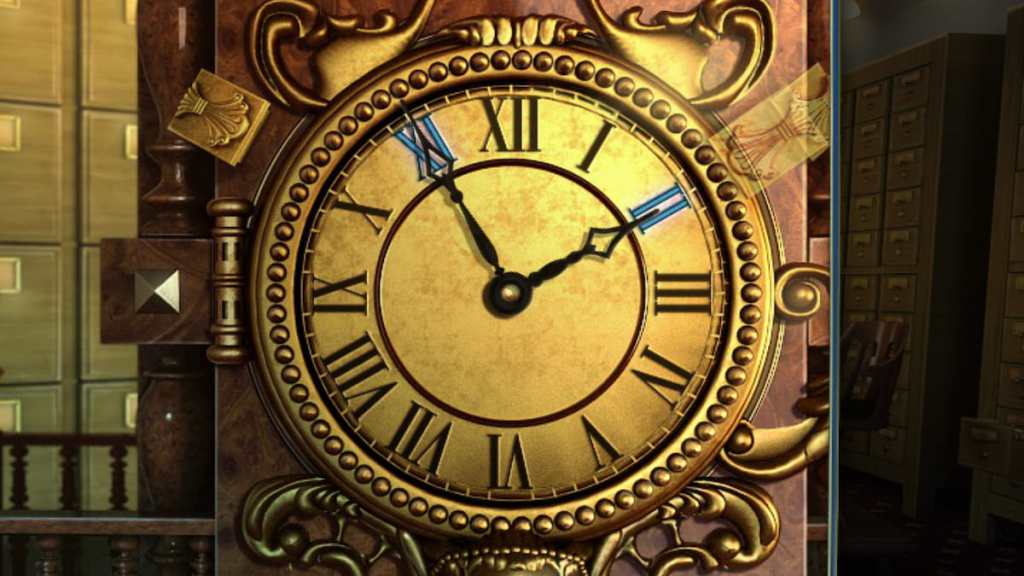
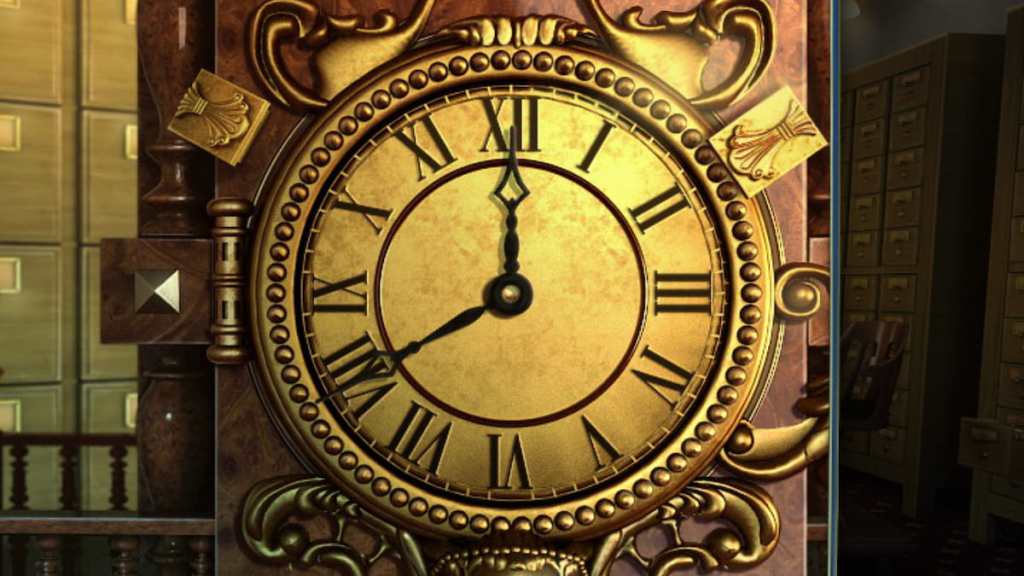
We now have all three hints required to complete the puzzle. Go to the clock in the mailroom and move both hands until you set it to the following times:
Each time you move the minute and hour hands to their correct times, you’ll unlock a latch. Opening all three rewards you with nippers, a gear, and an angle bracket figurine.
With these three items on hand, tap on the painting in between the two hanging flower pots to find a G.N. Kotton portrait. Use the nippers on the G to cut it off, allowing you to insert it and the angle bracket figurine into the Medallion of the Order. Now, the Medallion has the G and a compass figurine inside, allowing you to activate it with your ring. Doing so powers it up, converting it into a Medallion.

Now that you have the assembled Medallion, return to the blue movie theater room and use it on the podium under the speaker. Inside, you’ll find an audio cable and scissors, which you’ll need very soon.
Before using them, however, we can get another item by tapping on the blue glass box under the paintings and using the nippers on its lock. You’ll unlock the case, letting you grab some paper and a stencil.

You now have enough items to repair the speaker above the podium. Use the paper, scissors, and glue to fix the speaker. There are multiple parts to this section, with this being the end of one of its major components.
Next, we have a mini-puzzle to tackle in the movie projector room. With your new stencil on hand, tap on the puzzle above the desk and insert the stencil. Your goal is to move each row until the film matches the stencil. Thankfully, this isn’t too tricky, as you only need to press each button until you find all three matches. Doing so reveals a projector bulb, giving you the last item you need to fix the projector.
By now, if you haven’t been returning items to the projector, you should have the following resources in your inventory:
- Elbaite
- Videotape
- Pointer
- Roller
- Projector Lens
- Gear
- Audio Cable
- Projector Bulb
Six of these eight items can go inside the broken projector. Following the assembly guide next to it, place everything except the Elbaite and pointer inside each projector slot. The wheel goes at the top, while four of the remaining items require tapping on the projector’s body and inserting them into their respective slots. You can slot in the bulb by tapping on the circle to open a lid, letting you slot it inside and complete the repair process. The last step is to activate its screen by tapping on the orange “down” arrow on the wall.

There’s a small hiccup, though. Although the screen will go down slightly, it won’t descend fully. To fix this, head back into the theater room and use your pointer to fling its band away, letting it fall in full display.
With that done, return to the projector and turn it on to witness a cutscene, concluding this part of New York Mysteries 4’s story and letting you move on to its next region.
Research Institute walkthrough
We’ve now arrived at a research institute to search for more clues about Travis. Here are some initial tasks to help you progress in this area:
- Tap on the four-leaf clover collectible atop the van.
- Select the morphing object atop the pile of crates.
- Select the fountain to move forward before returning to this area. The construction worker will disappear, giving you a better view of the region.
- Tap on the bag on the bench. Take the lunchbox out to claim a key.
- On this same screen, unpack the lunchbox and make part of a sandwich to pick up some ham.
- Tap on the mysterious green crate to pick up tin snips and a chemical protection kit.

There are a few other components here, most notably the van’s puzzle, the barrel of acid, and the van’s mirror. However, we don’t yet have the required items to tackle them. Instead, head to the next area before taking the steps below to claim more items:
- Tap on the fountain before picking up the window handle out of the water.
- Select the morphing object next to the bench.
- Tap on the feather on the fountain.
- Go to the wooden planks on the left side of the screen. Clear them away by tapping them again.
- After getting rid of the planks, select the wallet to claim another key. Tap on the planks once more to reveal a door.

There are two paths from here. Since we don’t have enough items to tackle the left path, go inside the building. There are four spots to interact with initially:
- The first-aid kit for some sleeping pills.
- Packing tape on the desk with the flashing light.
- A morphing object at the top of the stairs.
- A statue collectible at the bottom of the stairs.

Right away, you can use the sleeping pills on the ham to prepare it for a future puzzle. When you’re ready, head up the stairs and interact with the window before reattaching its handle. You’ll find a ladder, which you can activate to access another helpful area. We don’t have everything we need for this new region just yet, but at least it’s ready for later.
With that part prepared, return to the first area and use the thick key you found earlier on the van’s back doors. Doing this unlocks our first major puzzle of this region.
Your goal is to use the central “key” mechanism to rotate each outer ring until the “empty” metal parts align with the spring on the lock’s right side. You do this by using the long metal peg to nudge each section in a given direction.

The best strategy for solving this is to turn the center dial clockwise until it picks up the other two rings. From here, you can turn it until the outer ring’s metal latch aligns with the spring. Once it’s in the right spot, turn the center circle counterclockwise until the middle latch is in place. Lastly, you’ll turn the center circle clockwise again to complete the puzzle. If at any point you accidentally move a latch into the wrong area, you can backtrack by linking the three circles and re-rotating the latches into their right spots before repeating this process.

Completing this puzzle will open the van, giving you a 15 item scavenger hunt again. Below is a list of every item and their locations:
- Respirator: On the van’s back wall.
- Electric wire: On the van’s right wall next to a ladder.
- Hazardous materials container: On the van’s left wall next to a yellow toolbox.
- Ladder: Leaning against the van’s right wall.
- Radiation dosimeter: On the ground in front of a gasoline can.
- Gloves: On a wooden crate behind some paint cans.
- Spray: Above a yellow toolbox.
- Model of a molecule: Next to a fire extinguisher on a back shelf.
- Detergent: On a wooden crate behind a gasoline can.
- Helmet: Underneath a brown coat on the van’s right wall.
- Test tubes: On the left side of a large roll of cables at the back of the van.
- Hammer: Inside a yellow toolbox.
- Lever: Inside a wooden box at the back of the van.
- Spray can: Inside a cardboard box.
- Boots: Inside a large roll of cables at the back of the van.

Your reward for finishing this mini scavenger hunt is a lever. We now have everything we need to return to the path with the ladder, letting us activate a crane atop the building’s rooftop using this newfound lever. Use the crane to lift up the pallet of wooden crates, revealing a dog on the other side.
Normally, this’d be quite cute. Unfortunately, this dog is a little aggressive, so we’ll need to get it to relax before we can proceed. Use the tin snips to cut through the gate’s chains before tossing the pill-filled ham to the dog. It’ll take a brief nap, allowing us to access another new region.
There is a lot going on in this area, from collectibles to gameplay items to pick up. Here are some resources we can pick up right now:
- A statue collectible atop the apartment’s staircase.
- A morphing object item directly below the statue.
- An adjustable wrench atop a toolbox next to the staircase’s right supporting beam.
- A fishing rod inside the same toolbox. Use your other key to open it.
- A knife stuck inside a table. You’ll find the table under a deck on the right side of the screen.
- At the same table, you’ll find a wooden figurine in front of the chair and a poker inside the barbeque.
- A pipe clamp from the pipes attached to the apartment’s left side.
- On the pipe’s screen, use your knife to cut off the hose.

With all of these items on hand, tap on the ladder leading up to the apartment door and use the fishing rod to make it descend. You won’t be able to unlock this door until much later, but we at least have access to it when the time comes to progress beyond this point.
For now, we have a key component for solving another puzzle. Head to the institute’s main foyer—the room with the first aid kit—and interact with the nightstand. Insert the wooden figurine inside before starting the puzzle.
Your objective here is to move each piece toward the figurine’s center so they form a large square. First, we’ll move the following beige pieces, in this order:
Next, we’ll move the yellow pieces in the following order:
With this mini puzzle complete, you can now open the drawer, letting you claim a glass container.

Heading out of this building, we can now remove the strange lid from the fountain using our adjustable wrench. Tap on the fountain and use the wrench on the lid to receive a nozzle before returning to our starting area. Our next goal is to remove the van’s mirror using the barbeque poker, allowing us to claim it as a quest item for later.
If you interacted with the red blinking lights in the foyer earlier, you may have noticed the hint involving this mirror. In your inventory, combine the poker with the mirror and packing tape. You’ll now have a mirror attached to a poker, which’ll help you spot an orange button behind the desk. Right now, the counter is in the way, so we need a way to remove it.

What’s the best way to do this? Acid. Head back to the institute’s starting area and interact with the acid barrel. You’ll need to use the following items on this screen:
- Glass container
- Pipe Clamp
- Hose
- Nozzle
- Chemical protection kit
With every item on your screen, attach the nozzle and hose to the barrel’s spout before attaching the clamp. Tapping on the glass container, turning the lever, and interacting with the red wheel will cause you to pour acid in the container to use on the foyer’s counter.

With a bottle of acid on hand, return to the red blinking light and use the acid bottle on the counter while wearing the protective kit. You can now use the mirror-poker on the area again, this time being able to turn off the light and open the door.
We’re now entering an office room within the research institute. We have another mini scavenger hunt to take part in, with the list below revealing every item’s location, in order:
- Safe Key: Move the chair to the right side of the room and interact with the desk.
- Sponge with ink: Move the paper weight on the desk to find the sponge underneath.
- Ruler: Tap on the nightstand in the back corner of the room. The ruler is under a stack of papers.
- Paper Knife: Select the desk in the back corner of the room to find the knife atop it.
- Button 5: Use the ruler on the desk’s top drawer to find the button inside. Read the green book for a special clue we’ll need later.
- Button 3: Return to the first desk. Use the paper knife to open the cardboard box and collect the button.
- Small key: Tap on the wall of keycards on the room’s left side to find the key hanging from an “f” display.
- Button 11: Select the brown bag on the windowsill. Use the small key to open it. Using the sponge on the window will also reveal a combination lock for another puzzle.
- Key 1: Input 2143 into the nightstand where you found the ruler.
- Key 2: Complete the safe puzzle.

You’ll need to complete the safe puzzle using the three buttons to obtain the final key. Tap on the safe in the bookshelf, slot in all three buttons, and rearrange each number until each row equals 34.
There are multiple solutions to this puzzle. Here is a set of numbers you can use during your playthrough:
- Row 1: 1, 2, 15, 16
- Row 2: 4, 7, 10, 13
- Row 3: 6, 8, 9, 11
- Row 4: 3, 5, 12, 14

Now that you have the second key from the safe, open “03_f” from the side wall and unlock its display. Claim the 01_f_20 keycard before returning to the apartment door from earlier. Entering this room will initiate another cutscene.
Travis’ Office walkthrough
After making it into Travis’ office, take the steps below to find some initial items:
- Select the collectible under the fallen display shelf.
- Tap on the morphing object atop the broken display cabinets.
- Tap on the windowsill on the right wall. Move the newspaper to pick up a Handle of a knife switch.
- Select the desk. Use the knife to pry open the drawer and read a book. The second page has the answer to a puzzle in this room that you can rip out for a Note with a hint.

With this note, we can solve the safe puzzle that’s against the left wall. Tap on the safe, place the note inside, and turn the dials according to its hints. Since the answer relies on the moons and stars on each dial, the solution is 8519.

Once you unlock the safe, open the door to find an orange tube. For now, place it inside the analyzer that’s next to the door and close its latch. Attempting to pump air out of it will reveal that the pump system is broken, with a key jammed inside one of the pipes. Pick up the key before exiting the screen and unlocking the room’s door.
With another area unlocked, you can pick up the following items:
- Pick up the collectible near the fish tank.
- Tap on the baskets on the left side of the screen. Clear away the books and open the basket to find a plate and some hay.
- Move this same basket to find a bowl of kerosene.
- Select the broken staircase to collect a baluster and two of four small boards.
- Pull the cord above the baskets to release a staircase.

While we’ll be returning here later for another puzzle, for now, head up the stairs and search for the following items:
- A collectible under a rope.
- A morphing object in the back corner of the area.
- A nail remover on the ground.
- An empty burner next to the tar tank.
- A large and small plank near the hole on the left side of the area.
- A rope you obtain by cutting it with your knife at three separate points.

With these resources on hand, tap on the crow on the roof before climbing the building’s ladder. You can now remove the nails with your nail remover, revealing an entrance that’s accessible with the rope you just picked up. Inside, you’ll find a door with a lock, which you can heat by filling your empty burner with kerosene and igniting it with your nail remover.

We now have access to a basement. Here are some initial items to collect:
- A four-leaf clover collectible near some boulders.
- A morphing object next to the door.
- Our final small and large wooden boards in a hole on the right side of the screen.

In the back-right corner of the room, you’ll also spot a metal box containing various colored wires. This is another puzzle that requires you to connect one side to the next, all the while passing through every node, aside from those that are broken. The only assistance you get is being able to rotate angled wires for easier passage.
Here are the solutions for all three parts:
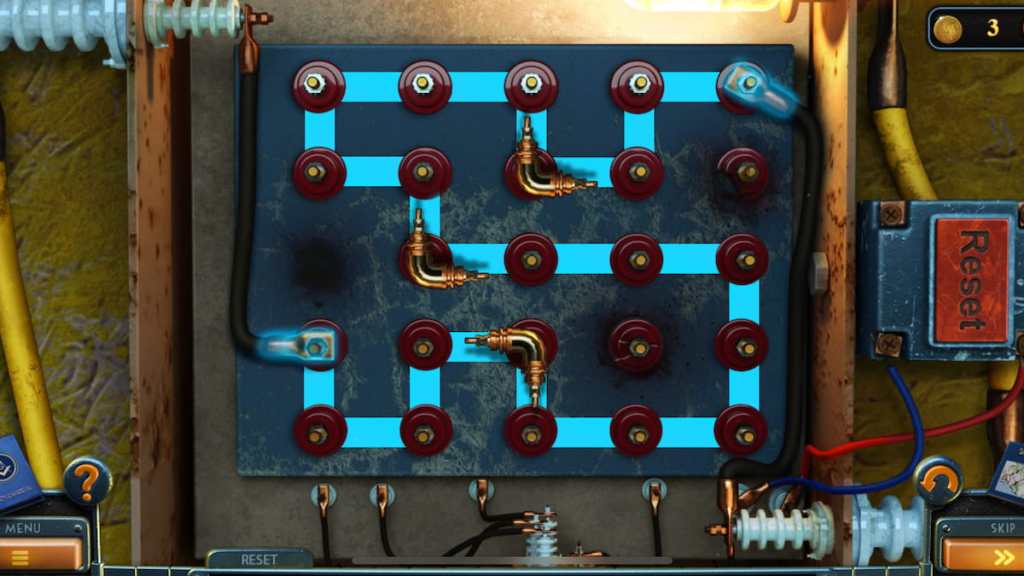
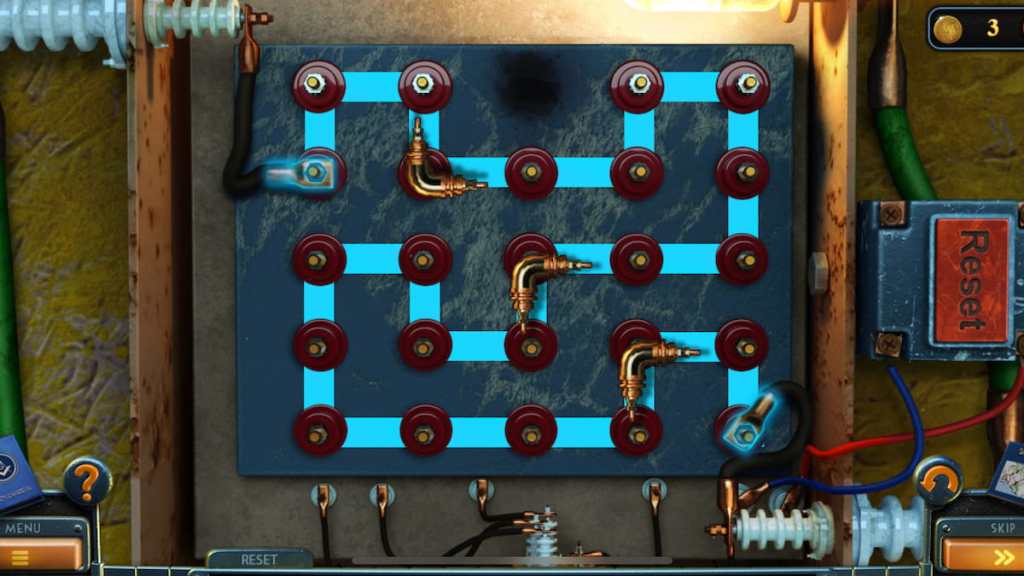

Once you complete all three sections, insert the knife switch handle into the wire terminal and activate it. Before we can go any further with this, we’ll need to obtain a cable from a later puzzle.
For now, head back to the rooftop and interact with the tar tank. You’ll need to use the following items on it:
- Hay
- Both sets of planks
- Plate
- Kerosene burner

With all four items in, use the spoon on the screen to scoop out some tar, allowing you to claim the tar as an item. Dunk the baluster inside the tank as well, as you’ll need it for later. You can now head back down to Travis’ office, where we first began this section, and use the tar on the analyzer pipe.
With the pipe fixed, turn the red dial, pour the orange liquid into the small container in front of the mortar and pestle, and place the container on the blue lift. Pressing the red button will tell you about the virus strain on a screen. More importantly, you can now cut the machine’s cable twice with your knife before returning to the basement.
Now that you have a cable for the basement, place it into the hole below the red and white cannon before exploring the pit where you found the wooden boards. Use your tar-covered baluster to pick up a trinket in the water.

Speaking of water, our next stop is the fish tank near the office’s staircase. Tap on the display underneath the tank and use your trinket on the pearl to activate its puzzle. Your goal is to get the pearl to the white circle in the bottom-right corner of the display while moving around its blocks. Pressing each arrow will move everything around, including the pearl and each block, if possible.
With this information in mind, press each arrow in the following order to complete the puzzle:
- Up
- Left
- Down
- Right
- Up
- Right
- Down
- Left
- Up
- Right
- Down
- Right
- Up
- Left
- Down
- Right
- Up
- Left
- Down
- Right
- Down
- Right
- Up
- Left
- Down
Finishing the puzzle unlocks a treasure chest, sending a key up to the tank’s opening. Use your nail to fish it out before going back down to the basement, unlocking the door, and witnessing another cutscene.
Old Lady’s house walkthrough
We’re finally getting closer to finding Travis and figuring out what’s going on with this massive mystery. Follow the steps below for some initial items to collect:
- Collect the morphing object above the potted flowers.
- Pick up the feather collectible above the potted flowers.
- Take the white cat statue on the floor and place it on the table in front of the old lady.
- Select the book underneath the old lady’s table and place it atop the table.
- Tap on the pillow on the floor.
- Select the tilted cat painting to set it in its correct spot.
- Pick up a sprout on the floor, followed by two more next to some crate plants.
- On the same plant screen, pick up one of five balls of yarn.
- Take the green coat, pink purse, and white coat from the two chairs and place them on the coat hangers next to the door.
- Tap on the couch. Collect the sprout from underneath it, the ball of yarn on top, and a second sprout from under a pillow. You’ll also find thread under the cushion.
- Select the cabinet behind the old lady and grab the brush.
- Grab the scoop next to the doorway.
- Pick up another ball of yarn next to the scoop.
- Tap on the plants in the bottom-left corner of the screen and pick up the bag of soil.

In the next room, there’s a second room full of objects to collect. Here’s a list of tasks you can complete here for the time being:
- Collect the morphing object atop the wardrobe.
- Grab the collectible atop the wardrobe.
- Tap on the assorted boxes on the wardrobe to rearrange them.
- Collect the sprout on the chair.
- Move the chair to reveal a pillow and blanket. Move both onto the chair and interact with the hidden doorway.
- Now that the cat is distracted, collect the ball of yarn and sprout from the bed before rearranging its pillows.
- Tap on the blanket on the chair to move it back to the bed.
- Select the rug to reveal another sprout.
- Move the curtain to reveal a push broom.
- Tap the bottom drawer of the dresser. Collect the sprout before opening the top drawer and claiming the threads, yarn, and another sprout. Open the box to claim a key.
- On the same screen, close the drawer and open the bottom one to grab another thread spool.
- Move to the top of dresser. Tap on the cat portrait to adjust its position and use the key to unlock the box and collect a tusk. Place the rest of the dresser’s items inside the jewelry box.
- Reattach the tusk to the elephant display. Collect the thread and use your knife to unscrew the bolts.
- Use your knife on the secret entrance to reveal another door.

Now that you have a bunch of new items to play with, return to the room with the old lady. She’ll give you a cellar key, which you can use to unlock another room soon. Before doing so, tap on the plant crates and use the following items on them:
- Scoop and brush on the pile of dirt.
- Bag of soil on the empty crate and a knife to cut it open.
- All ten sprouts inside the crate.
- Watering can on the sprouts.

Doing this gives you your fifth and final thread. You can now tap on the display case behind the old lady and place both the balls of yarn and thread inside. Your last task in this room is to use your push broom on the curtain to fix it.
By now, you should only have Elbaite, the knife, and a cellar key in your inventory. Head into the bedroom and use your key to unlock the door next to the dresser. You’ll enter a pantry full of food and a scavenger hunt to find 15 colored cubes. Here’s a list of every cube’s location:
- Inside the slippers on the ground.
- Inside a glass jar behind a brown container on the pantry’s bottom shelf.
- Atop a bowl of fruit.
- Inside a white box.
- Behind a blanket connected to this box.
- Inside a jar next to this box.
- Inside a wool basket.
- Also inside the wool basket.
- Behind a jar of grains above the puzzle box.
- Inside a toolbox. Use the scissors on the right shelf to cut a rope holding a key. Use this key to unlock the box.
- Use a crowbar on the pantry’s top shelf to break open the trapdoor.
- Under the trapdoor, use the lever on the same screen to activate the pulley system and claim another cube.
- Inside a lampshade at the top of the pantry.
- Behind dried peppers and garlic.
- Inside a purse. Use the knife on the floor and the brick underneath to unstick it from the shelf.

With all 15 cubes on hand, insert them into the puzzle box to begin your next challenge. Using the two placeholders as reference, your objective is to create a cohesive image using every cube. The complete solution will create a light blue diamond with red and dark blue in the center, as shown below:

Finishing the puzzle will reward you with glasses to return to the old lady. She’ll give you a key in return to use on the secret door in the bedroom. Clear away the wooden boards and other debris to uncover the door, allowing you to enter Travis’ home.
Travis’ house walkthrough
We’ve officially made it into Travis’ house. Here are some initial steps to take in this new region:
- Tap on the camera on the door to gain it as an item.
- Select the nightstand and use your knife to open it. Grab the chip inside it.
- Select the books on the bed to collect a manual on photography, photo, and emergency evacuation plan.
- Grab the collectible on top of the wardrobe.
- Read the safe combination hints atop the left doorway, beside the curtain, and in the back corner of the room.

With these initial five steps done, head into the room to your right to find a hallway. Here are some additional steps to take:
- Tap on the morphing object next to the clock.
- Use your knife to cut open the cardboard box next to the clock to obtain a tank for photographic film and photo paper.
- Select the coats on the left side of the screen and open their pockets to claim a key.
- Collect the four-leaf clover collectible above the coats.

Before going down the stairs, return to Travis’ bedroom and use the key to unlock the wardrobe’s locked compartment. You’ll find a colorful puzzle to slot your chip into.
To complete this puzzle, you’ll need to slide each chip around so it lands in its respective color section. However, they can only go into the empty slot closest to the center and can’t jump over other chips. Here’s a step-by-step guide to solving this puzzle:
- Move the yellow section’s green chip into red.
- Move both yellow chips into the yellow section.
- Slide the green section’s blue chip into the blue section and the red chip into the yellow section.
- Move the red section’s green chip into the green section.
- Alternate the chips from the blue and red sections so the third green chip goes into the green section.
- Move the yellow section red chip into the red section.
- Slide the blue chips into green and yellow’s empty slots so the third red chip can go into its section.
- Return the blue chips to their own section.

Completing this puzzle rewards you with another key to use later in this part. Before heading down the staircase in the other area, we need to tackle the mystery with this camera. For now, head into the red doorway and select the fridge to start a mini scavenger hunt. Here’s a list of every item and their locations:
- Lightbulb: On the fridge’s door.
- Metal bracket: On the fridge’s door.
- Matches: Attach the handle to the top compartment on the door to find some matches.
- Can opener: Inside the top compartment. Combine both halves and the screw together to collect them.
- Triangle button: Tap the top part of the fridge and change out the lightbulbs. The button is on one of the shelves.
- Piece of cardboard: Tap the fridge’s middle shelf and the cereal box.
- Circle button: Get rid of the bees by using the piece of cardboard and matches in the top section. Turn on the fridge before going to the middle section and collecting the button from the cereal box.
- Square button: Open the pizza box and move one of the slices.
- Line button: Tap on the rotten burger.
- Star button: Select the bottom fridge drawers. Use the can opener to extract it from the can.

Now that you have all five buttons, tap the top of the fridge and insert them. The correct order to press them depends on the number of lines in the shape. In short, you need to press Circle, Line, Triangle, Square, and Star. Upon opening the area, collect the Sodium sulphate solution and Benzol before moving on.

We now have two key ingredients to help us develop these photos. Leave this room and head down the stairs before taking the following steps:
- Tap on the morphing object above the lamp.
- Select the photo wall to receive a photo. Read the safe combination here.
- Go to the desk. Open the chemical bottle and add your Sodium sulphate solution and Benzol to it to receive the developing solution.
- Place your two photos and emergency evacuation plan on the table blueprint.
- Use the key on the safe to prepare it for a later puzzle.

Now that we have the developing solution and cleared some inventory space, use the tank and solution on your camera. You’ll remove the film, place it inside the tank, and use the solution to develop it.
Before we go back upstairs, we’re ready to tackle the safe. Use the key on it and read the combination page that appears on it. Using the colored circles on the page, we’ll discover 95 is the solution to it. You’ll find Fixing solution inside, giving you the final piece you need for the photo development process.

Here are the steps to developing Travis’ photo after returning to the red room and interacting with the film analyzer:
- Place the manual on photography, photo paper, and tank of developed film in the desk’s area.
- Place the film inside the machine.
- Pour the Fixer solution.
- Cut the photo paper with your knife and place it inside the water.
- Activate the machine and pick up the photo with the nearby tongs.
- Go to the room’s sink and fill up the container.
- Place the undeveloped photo inside.

With the final photo on hand, return to the safe’s room and place the picture on the blueprint table. You’ll initiate a cutscene, leading you directly to the final part of New York Mysteries 4’s storyline.
Water-pumping station walkthrough
The last section we’ll explore is the water-pumping station. Here are some first steps to take before advancing:
- Tap the collectible above the car.
- Collect the morphing object on a building above a burning barrel.
- Grab the bottle of alcohol from atop a green crate.
- Tap the white clothes on the left side of the screen. Cut some of it with your knife.
- Combine both items to make a Molotov cocktail.
- Use the cocktail on the burning barrel.
- Interact with the yellow guard building and grab the signal pistol.
- Press the big red button inside the guard building before leaving the zone.

We’re now inside the water-pumping station facility in search of Travis. After collecting the morphing object next to the staircase, open the wooden crate within the workshop area on the left side of your screen. You’ll find a valve inside, which you can use on a yellow door on the opposite side of the facility.
The next section is a timed trial. You’ll have just over a minute to make it to the end. Here’s the exact path to take to exit this area:
- Enter the right exit and rummage through the clothes for a key.
- Go forward, followed by left, and unlock the metal door with the key.
- Go out this door and collect the brick before returning.
- Go up the staircase to your right and throw a brick at the light to distract the guards.
- Leave through the metal door again and head right to receive a wrench.
- Backtrack twice and head down the central staircase. Use the wrench on the pipes to get another key.
- Go through the metal door again and head forward to find a second door. Unlock it with the key.

Now that we’ve exited that stressful situation, it’s time to move forward. Open the yellow jacket to collect a keycard. Backtracking to the water-pumping station’s facility and climbing the stairs will now lead to a locked door you can unlock with this keycard.
Within this new room, tap on the two areas lit up with lamps. One will require pressing a red button, rewarding you with a key. Before leaving, you can find a morphing object underneath the right-most desk. From here, return to the bridge and use the key to unlock the latch in the ground, leading to a small puzzle.
During this puzzle, you’ll place various objects in your inventory based on blue highlights to reassemble and activate a water reservoir. Here are all the components you’ll need to activate:
- Place the valve and handle in their respective spots. Activate both.
- Insert everything except the electrical fuse into their spots.
- Open the panel in the top-right corner and insert the fuse.

With that done, return to the security room and use the right terminal to redirect water into the upper right tank. This’ll require another puzzle where each tank redirects in different directions. Since the yellow tank is the only one that sends water to the upper right one, our goal is to send water here before transporting it all to the top-right.
Here’s a complete guide to solving this puzzle:
- Empty the middle-right grey tank into the bottom-right purple one.
- Empty purple into red and yellow.
- Empty blue into the top-left purple tank.
- Empty the top-left purple into red.
- Fully empty red into blue and green.
- Fully empty green into yellow.
- Fully empty yellow into the upper right tank.
- Tap blue, purple, red, green, and yellow once each. Repeat this three times.
- Empty middle-grey and yellow.
- Empty purple, red, green, and yellow to complete the puzzle.

Once you finish the puzzle, interact with the left terminal to initiate another puzzle. Here are the steps to completing it:
- Move the yellow bar left two squares and right one.
- Move it up one square and right two.
- Move the bar down and up one square before sliding it right twice.
- Move it left, right, and down one square, in this order. Repeat this once.
- Slide it left two squares, right one, and down one.
- Slide it left one square and right two to complete the puzzle.

With all that done, return to the water-pumping station’s inner facility and leave through the yellow door to witness another cutscene. After watching it, you’ll have one last task: repair your signal pistol.
There are ten pieces to collect in this area. Four are on the bridge directly in front of Travis, while two more are on the right in the same spot as a collectible feather. The last four are obtainable by tapping the water generator-like machine on the left side of the bridge.

With all ten parts available, select the pistol in your inventory to reassemble it. You’ll need to slot each part together using the blue outlines as a guide, starting with the small bolt in the gear. Following these guidelines will let you repair the pistol, which you’ll need to use on Travis to wrap up New York Mysteries 4’s story.


 – IGN")

